Gambling Affiliation

Gambling Affiliation

Sunday, 28 February 2016

KALI – How to install Notepad++ – The Visual Guide

We all love Notepad++, luckily we can install this on Kali.

Step 1 – Install Wine

sudo apt-get install wine

*****

Step 2 – Download Notepad++

http://notepad-plus-plus.org/download/v6.6.7.html

Save

create new folder > Notepad – save the download in this folder

Step 3 – Use wine to open npp.6.6.7.Installer.exe

Open a terminal

cd notepad

ls

wine npp.6.6.7.Installer.exe

**If you’re on a 64 bit machine you’ll get an error about Multi Architecture instructions.

Okay, so lets fix this, and make your machine able to cope with multiple architectures.

Step 4 – Make 64 bit machines “Multi Architecture”

In a root terminal type

dpkg  –add-architecture i386

apt-get update

apt-get install wine-bin:i386

Now, lets try step 3 again.

Now the wine installer runs

Okay > Next > I Agree

Accept defaults in Setup

Next > Next >

Tick the box to create a shortcut on the desktop

Install > Finish > Run Notepad++

Here’s your shortcut..

Viola!  Easey Peasey

*****

Saturday, 27 February 2016

How to create instant disposable chatrooms with Hack.chat?

Creating a private chatroom in Hack.chat is dead simple. All you need to do is go to the website URL and add a ? and the name of your chatroom. This would make the URL looks like this: https://hack.chat/?random-channel and make a personal chat room with name “random-channel.”

After creating that URL, you can send this to anyone and start chatting in moments. Because the channel you created is private and its name or information isn’t stored anywhere, no random person can appear in your Hack.chat.

Hack.chat has also provided some pre-existing channels to try out. Just head to the home page, click on any of them and add your name to start.

Its creator Andrew Belt promises the Hack.chat servers never store any data and chats. So, if privacy is your concern, give it a quick try. Share this article with your friends and chat privately using Hack.chat.

Hack.chat

Friday, 26 February 2016

Turn on Fast startup on Windows 10:


Open settings on your Windows 10 PC.

A settings Window will pop up. Select the ‘System’, the first option in the image below

Under the System Window, click on ‘Power & Sleep’. Under this window, click on ‘Additional Power Settings’

When the Additional Power Settings option opens up, you will see ‘Choose what the power buttons do‘ option in the left panel, click on it,

Once you click on ‘Choose what the power buttons do’, you will see a checkbox under the shutdown settings with text as ‘Turn on Fast Startup (recommended)’. Check the checkbox and Save changes.

Once you have saved the changes, you have turned on the fast startup for your Windows 1o PC. This will make your Windows 10 system faster with fast boot up on startup.

Wednesday, 24 February 2016

Hack a Computer Only with just a IP Address in Easy steps

Steps to Hack IP Address:


1) Prepare the IP address of the Victim. (e.g : 101.23.53.70 )

2) Download and Install Advanced Port Scanner.


3) Open Advanced Port Scanner and Type the IP Address in the right column and Click Scan.


hack pc, hack with ip
4) It will lists you all Opened Ports of the Victim’s PC or Router. (e.g : Port 91 )
5) After retrieving the IP address and the Opened Ports of the Victim, Open Command Prompt (CMD)
and Type: telnet [IP ADDRESS] [PORT]
e.g : telnet 101.23.53.70  91
6) Now you’ll be asked to Enter Login Information, Just type Username and Password and hit Enter.
If no password is used just type the Username.

Done! Now you’ll get access to all Victim’s Files and Documents by browsing with CMD (use cd, copy, delete, mv… to do all tricks.)


Enjoy :)

Saturday, 20 February 2016

How To Enable GodMode In Windows and Its Complete Features

If you are a long-time Windows user, you may remember a trick to enable 'God Mode'. It may sound epic depending on your expectations, but the easiest way to describe the feature is that it gives access to all of the operating system's control panels from within a single folder.
In fact, its real name is the Windows Master Control Panel shortcutGod Mode was an inside joke, but one that stuck.
As it turns out, you can enable God Mode in Windows 10 as well. Why would you need it? The feature is useful for those in IT, those who manage a computer, and obviously for those advanced enthusiasts. Most consumers have little need for the feature, and in fact, it could lend itself to doing some damage to the OS.
Think of God Mode as a backdoor to the OS to access all the settings. Of course, just enabling it does nothing, but just don't tinker around too much without an OS backup. So let's get to it:
God Mode in Windows 10

Enable God Mode in Windows 10

  1. Make sure your system account has administrative privileges
  2. Right-click on the Windows 10 desktop and choose New > Folder
  3. Name the folder: GodMode.{ED7BA470-8E54-465E-825C-99712043E01C} and hitenter/return to make it stick
God Mode in Windows 10
You can actually name the folder anything you want like NinjaCat mode. Simply replace 'GodMode' before the {....} characters to your liking.
God Mode in Windows 10
Truth be told, it is not that exciting. However, if you are a serious user having all of these shortcuts in one spot is super convenient.
Let us know how you use God Mode and why you like it in comments!
If you think this guide is helpful, we have many more posts like this in our Windows 10 help, tips, and tricks page. Or try our massive Windows 10 Forums at Windows Central for more help!

How To Bypass Anti-virus and Hack Windows (7/8/8.1/10) Computers

Today I will show you how to  Bypass Av with Unicorn and Hack windows (7/8/8.1/10) using Armitage and Cobalt Strike on Kali Linux 2.0(Kali Sana).


Disclaimer: This tutorial is for educational purposes only and we are NOT responsible in any way for how this information is used, use it at your own risk.


Command you will use in this Tutorial:

You need to install mingw32: 
 root@k4linux:~apt-get install mingw32
The command you need to use to compile from c to executable:
 root@k4linux:~i586-mingw32msvc-gcc  clean.c -o clean.exe -lws2_32

All the steps for this tutorial are explained on a Video on our YoutubChannel.

In this video tutorial i explain to you how to use Armitage and also Cobalt Strike to Hack Windows 7/8/8.1/10

How To Hack WPA/WPA2 Wi-Fi With Kali Linux & Aircrack-ng


          Kali Linux can be used for many things, but it probably is best known for its ability to penetration test, or “hack,” WPA and WPA2 networks. There are hundreds of Windows applications that claim they can hack WPA; don’t get them! They’re just scams, used by professional hackers, to lure newbie or wannabe hackers into getting hacked themselves. There is only one way that hackers get into your network, and that is with a Linux-based OS, a wireless card capable of monitor mode, and aircrack-ng or similar. Also note that, even with these tools, Wi-Fi cracking is not for beginners. Playing with it requires basic knowledge of how WPA authentication works, and moderate familiarity with Kali Linux and its tools. If you feel you have the necessary skills, let’s begin:
These are things that you’ll need:
  • A wireless adapter capable of injection/monitor mode. Some computers have network cards capable of this from the factory. If you’re, like most however, you’ll have to buy an external one. Here is a list of the best:http://blackmoreops.com/recommended-usb-wireless-cards-kali-linux
  • A wordlist to attempt to “crack” the password once it has been captured
  • Time and patients
If you have these then roll up your sleeves and let’s see how secure your network is!
          Important notice: Hacking into anyone’s Wi-Fi without permission is considered an illegal act or crime in most countries. We are performing this tutorial for the sake of penetration testing, hacking to become more secure, and are using our own test network and router.
By reading and/or using the information below, you are agreeing to ourDisclaimer


Step One:

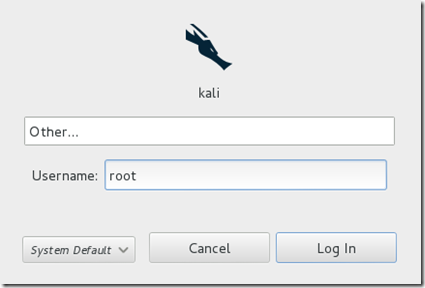
Start Kali Linux and login, preferably as root.
Step 1
Step Two:
Plugin your injection-capable wireless adapter, (Unless your native computer wireless card supports it). If you’re using Kali in VMware, then you might have to connect the card via theimageicon in the device menu.
Step Three:
Disconnect from all wireless networks, open a Terminal, and type airmon-ng
Step 3
This will list all of the wireless cards that support monitor (not injection) mode. If no cards are listed, try disconnecting and reconnecting the adapter (if you’re using one) and check that it supports monitor mode. If you’re not using an external adapter, and you still don’t see anything listed, then your card doesn’t support monitor mode, and you’ll have to purchase an external one (see the link in the requirements). You can see here that my card supports monitor mode and that it’s listed as wlan0.
Step Four:
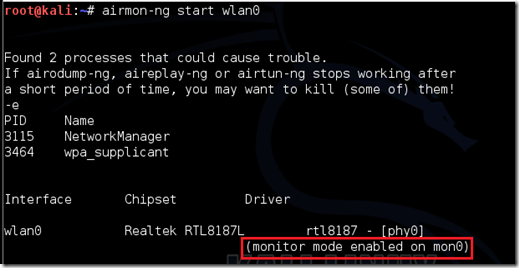
Type airmon-ng start followed by the interface name of your wireless card. mine is wlan0, so my command would be: airmon-ng start wlan0
Step 4
The “(monitor mode enabled)” message means that the card has successfully been put into monitor mode. Note the name of the new monitor interface, mon0.

EDIT:A bug recently discovered in Kali Linux makes airmon-ng set the channel as a fixed “-1” when you first enable mon0. If you receive this error, or simply do not want to take the chance, follow these steps after enabling mon0:
Type: ifconfig [interface of wireless card] down and hit Enter.
Replace [interface of wireless card] with the name of the interface that you enabled mon0 on; probably called wlan0. This disables the wireless card from connecting to the internet, allowing it to focus on monitor mode instead.
After you have disabled mon0 (completed the wireless section of the tutorial), you’ll need to enable wlan0 (or name of wireless interface), by typing: ifconfig [interface of wireless card] up and pressing Enter.


Step Five:
Type airodump-ng followed by the name of the new monitor interface, which is probablymon0.
Step 5
If you receive a “fixed channel –1” error, see the Edit above.
Step Six:
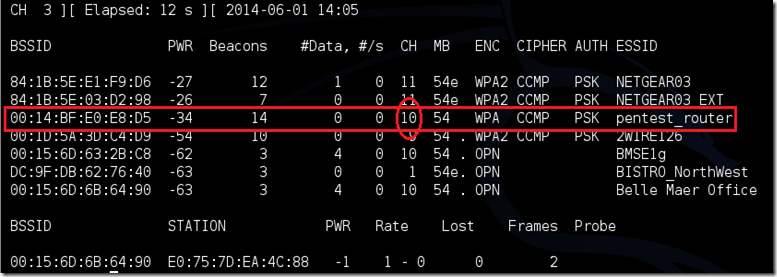
Airodump will now list all of the wireless networks in your area, and a lot of useful information about them. Locate your network or the network that you have permission to penetration test. Once you’ve spotted your network on the ever-populating list, hit Ctrl + Con your keyboard to stop the process. Note the channel of your target network.
step 6

Step Seven:
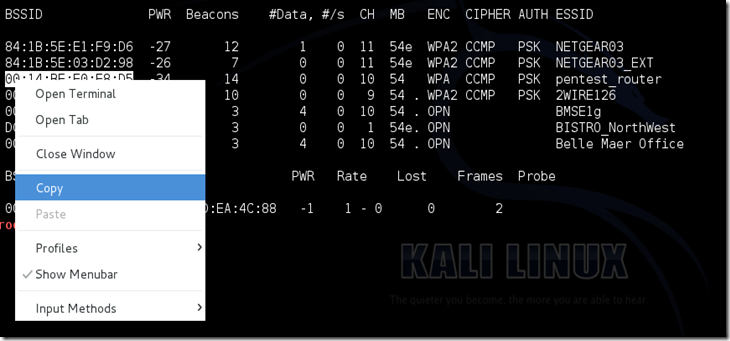
Copy the BSSID of the target network
Step 7

Now type this command:
airodump-ng -c [channel] --bssid [bssid] -w /root/Desktop/ [monitor interface]Replace [channel] with the channel of your target network. Paste the network BSSID where [bssid] is, and replace [monitor interface] with the name of your monitor-enabled interface, (mon0). The “–w” and file path command specifies a place where airodump will save any intercepted 4-way handshakes (necessary to crack the password). Here we saved it to the Desktop, but you can save it anywhere.

A complete command should look similar this:
airodump-ng -c 10 --bssid 00:14:BF:E0:E8:D5 -w /root/Desktop/ mon0

image
Now press enter.
Step Eight:
Airodump with now monitor only the target network, allowing us to capture more specific information about it. What we’re really doing now is waiting for a device to connect or reconnect to the network, forcing the router to send out the four-way handshake that we need to capture in order to crack the password.
Also, four files should show up on your desktop, this is where the handshake will be saved when captured, so don’t delete them!

But we’re not really going to wait for a device to connect, no, that’s not what impatient hackers do. We’re actually going to use another cool-tool that belongs to the aircrack suite called aireplay-ng, to speed up the process. Instead of waiting for a device to connect, hackers can use this tool to force a device to reconnect by sending deauthentication (deauth) packets to one of the networks devices, making it think that it has to reconnect with the network.
Of course, in order for this tool to work, there has to be someone else connected to the network first, so watch the airodump-ng and wait for a client to show up. It might take a long time, or it might only take a second before the first one shows. If none show up after a lengthy wait, then the network might be empty right now, or you’re to far away from the network.

You can see in this picture, that a client has appeared on our network, allowing us to start the next step.

Step 8
Step Nine:
Leave airodump-ng running and open a second terminal. In this terminal, type this command:
aireplay-ng –0 2 –a [router bssid] –c [client bssid] mon0The –0 is a short cut for the deauth mode and the 2 is the number of deauth packets to send.
-a indicates the access point/router’s BSSID, replace [router bssid] with the BSSID of the target network, which in my case, is 00:14:BF:E0:E8:D5.
-c indicates the client’s BSSID, the device we’re trying to deauth, noted in the previous picture. Replace the [client bssid] with the BSSID of the connected client, this will be listed under “STATION.”
And of course, mon0 merely means the monitor interface, change it if yours is different.

My complete command looks like this:
aireplay-ng –0 2 –a 00:14:BF:E0:E8:D5 –c 4C:EB:42:59:DE:31 mon0

Step 9
Step Ten:
Upon hitting Enter, you’ll see aireplay-ng send the packets. If you were close enough to the target client, and the deauthentication process works, this message will appear on the airodump screen (which you left open):
image

step 10
This means that the handshake has been captured, the password is in the hacker’s hands, in some form or another. You can close the aireplay-ng terminal and hit Ctrl + C on the airodump-ng terminal to stop monitoring the network, but don’t close it yet just incase you need some of the information later.
If you didn’t receive the “handshake message,” then something went wrong in the process of sending the packets. Unfortunately, a variety of things can go wrong. You might just be too far away, and all you need to do is move closer. The device you’re attempting to deauth might not be set to automatically reconnect, in which case you’ll either have to try another device, or leave airodump on indefinitely until someone or something connects to the network. If you’re very close to the network, you could try a WiFi spoofing tool like wifi-honey, to try to fool the device into thinking that you’re the router. However, keep in mind that this requires that you be significantly closer to the device than the router itself. So unless you happen to be in your victim’s house, this is not recommended.
Do note that, despite your best efforts, there are many WPA networks that simply can’t be cracked by these tools. The network could be empty, or the password could be 64 characters long, etc.
Step 11:
This concludes the external part of this tutorial. From now on, the process is entirely between your computer, and those four files on your Desktop. Actually, it’s the .cap one, that is important. Open a new Terminal, and type in this command:
aircrack-ng -a2 -b [router bssid] -w [path to wordlist] /root/Desktop/*.cap

-a is the method aircrack will use to crack the handshake, 2=WPA method.
-b stands for bssid, replace [router bssid] with the BSSID of the target router, mine is 00:14:BF:E0:E8:D5.
-w stands for wordlist, replace [path to wordlist] with the path to a wordlist that you have downloaded. I have a wordlist called “wpa.txt” in the root folder.
/root/Desktop/*.cap is the path to the .cap file containing the password. The means wild card in Linux, and since I’m assuming that there are no other .cap files on your Desktop, this should work fine the way it is.

My complete command looks like this:
aircrack-ng –a2 –b 00:14:BF:E0:E8:D5 –w /root/wpa.txt  /root/Desktop/*.cap
image

Now press Enter.
Step 12:
Aircrack-ng will now launch into the process of cracking the password. However, it will only crack it if the password happens to be in the wordlist that you’ve selected. Sometimes, it’s not. If this is the case, you can try other wordlists. If you simply cannot find the password no matter how many wordlists you try, then it appears your penetration test has failed, and the network is at least safe from basic brute-force attacks.
Cracking the password might take a long time depending on the size of the wordlist. Mine went very quickly.
If the phrase is in the wordlist, then aircrack-ng will show it too you like this:

image

The passphrase to our test-network was “notsecure,” and you can see here that it was in the wordlist, and aircrack found it.
If you find the password without a decent struggle, then change your password, if it’s your network. If you’re penetration testing for someone, then tell them to change their password as soon as possible.

Wednesday, 10 February 2016

How to unpack / pack an APK file


Did you know that when you download an Android App from Google Play or Amazon Store, you are actually downloading 1 single file?

That file has an APK extension and it is a kind of zip file. In fact, if you rename the extension from APK to ZIP and extract it, you will be able to navigate thru its asset files (images, audio,...). But unzipping the file does not make all its content accessible. E.g, if you try to open the AndroidManifest.xml, you will see that its content is not on plain text. So, if you want to correctly unpack all files from the APK, you can use a tool called Apktool.

Here is a step-by-step tutorial to unpack an APK file:

1) Download the apktool file and its system dependency file, both available for free here. (For example, If you are using an MAC, you will have to download: apktool1.5.2.tar.bz2 and apktool-install-macosx-r05-ibot.tar.bz2).

2) Extract both files to same directory (to make things easier :) )

3) Put the apk file that you want to unpack in that same directory

4) Unpack the apk doing with the following command: "./apktool d [your apk file]" (this is a MAC/linux
command, if you are using Windows, it should probably be "apktool d [your apk file]")

 That is it, the apktool will have created a new directory with the same name of your apk file where you will find the apk content.

If you want to pack that directory back again into an apk (let's say, after you edited something), just use the following command: "./apktool b [apk dir name] [apk file.apk]"


Important note: when you unpack and pack back the apk, it loses its android signature. So, if you want to install that apk on a device, you have to sign it again using the android Debug Key or your own key. You can do that by running the following command: "jarsigner -verbose -keystore [your keystore file] [your apk file.apk] [your keystore alias]"

How a Cracker breaks wifi and more details, WEP,WPA,WPA2,WPS and more

Attacking wifi tools and how attacks work.

Wifi types are open, wep, wpa1, WPA2, wpa2 enterprise. There are also services on wifi to help people connect for the first time easier.  This service is called wps.  WPS is either active or passive. So here are the bellow


And here is the explanation for the different wifi types of connections and attacks and security against them.


Open:

There are open wifi networks are just that open to everyone. There is not much to do here than connect.

Wep:

Wired Equivalent Privacy is the first encryption type for wifi. It's not meant to be the most secure but better than nothing. There is an vulnerability in wep protocol is a vulnerability in the rc4 cipher stream. the Fluhrer, martin, and Shamir attack (FMS) is a n attack to recover the key in large number of message streams. This attack is in the weak initialization vectors on the rc4 for wep. by gathering a lot of IVs around 50k you should be able to easily get the key. Read more about the actual attack and the link above.
These attacks are easy to implement in various tools like aircrack or scripts that automate the attack for you like wifite or wepcrackgui.
So the attack goes like this generally speaking. attacker puts card in monitor mode with something like airmon-ng, then once in monitor mode the card can pick up packets across the air even if it is not connected to that network (see monitor mode). From there attacker picks a channel of his target and begins his attack. After capturing IV packets by either deauthenticating the client, doing a replay attack, or some other attack the attacker tries to then use a FMS attack against the IVs and get the key.
For another simple explanation of the WEP attack can be found here.


WPA1:

wifi protected access is leaps and bounds ahead of WEP though still has some issues with it. weak keys, wpa packet spoofing and decryption. with WPA there are attacks against the WPA-TKIP allowing decrypt packets and then inject the packets to hijeck connections.
you can read more about the actual attacks at the bellow links
https://lirias.kuleuven.be/bitstream/123456789/401042/1/wpatkip.pdf http://dl.aircrack-ng.org/breakingwepandwpa.pdf http://download.aircrack-ng.org/wiki-files/doc/enhanced_tkip_michael.pdf
there are 2 basic encryption protocols with WPA CCMP and TKIP. most the attacks above use the TKIP. the if the nettwork is using CCMP then its using the AES cipher which is a lot stronger.
Though other attacks against WPA personal (WPA1-PSK) is to run either a dictionary attack against the handshake or if the SSID is a common SSID to use a rainbow table. Rainbow tables are generally not used because the way WPA works is that it stalts the password hashes with the SSID of the wifi network. This means that 2 networks with 2 different SSIDs and the same passwords would have 2 different pairwise master keys PMKs. So less you have a user with a simple dictionary word or a common ssid name brute forcing is generally not the best option out there. Though this does not mean its not possible if you take into human habit and the standard into account. the WPA-PSK requires the passphrase to be 8-63 characters long. Knowing this fact and the fact that humans want to try the least possible they most likely will use a word starting and being only 8 digits long aka the minimum length required. This allows an attacker to create mask attacks against the wpa keys in hoping that the human element is what created the weakness. Since a mask attack does not require brute forcing 1-7 digits it starts at only trying the 8 digits and then on top of that starting with trying only say the first 4 characters of the password be letter and then ending with numbers or symbols you can reduce the attack brute force dramatically in time making a brute force with a GPU possible. here is a benchmark on how fast a single GPU can run for pyrit HERE. So if you combine a lot of GPUs together like the amazon cloud or just creating your own farm or botnet. then cracking a WPA is a lot faster than expected.
you can find out more about the WPA1 standard at the bellow link
https://en.wikipedia.org/wiki/IEEE_802.11


WPA2 Personal (aka WPA2-PSK):

along with the mention above with WPA the WPA2 protofal was built to fix shortcomings in the authentication and privacy of WPA1. i wont go over a lot of the information again about the attacks. Though WPA2 in general has less flaws in it than WPA though the attack vectors are still the same.

WPA Enterprise:

WPA-Enterprise is the use of a RADIUS or a TACACS+ server to authenticate connections on the network. The only major flaw found in it is the MS-CHAPv2 which severely reduces the complexity of brute-force attacks. Check out the bellow link for more information on the attack. https://www.cloudcracker.com/blog/2012/07/29/cracking-ms-chap-v2/

WPS:

Wps as a protocol to help non technical users to easily setup wifi networks where they wouldn’t have to type out complex passwords but only push a button and connect. you can find out more about WPS at the bellow link
https://en.wikipedia.org/wiki/Wi-Fi_Protected_Setup
with the WPS attack by reaver was originally explained here and explained here and then was later developed and improved upon by wiire with the pixie dust attack and can find the code for it here pixiewps .
A more updated toolset is located at the next 2 links for reaver and pixiewps

since there is a huge amount of resource for information on both the links above i won’t go into the attacks much or how they are done.
instead even better… VIDEO!!!!

Sunday, 7 February 2016

How to root your android phone without computer

Hello Guys if you want to ROOT any phone without computer you need to follow these steps

STEP 1-> First you need to download  Kingo ROOT.apk file from google. you can download it from here https://root-apk.kingoapp.com

STEP 2->Now install this app into your android device.

To install this file first you need to click on Unknown Sources into your phone settings to install the Application.

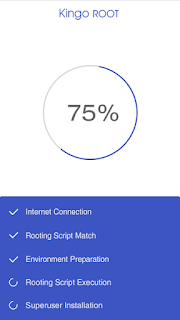
STEP 3->Now Open Kingo ROOT app  Click "One Click Root" to start the rooting process.

Waiting for a few seconds till the result screen appear.

STEP 4->Succeeded or Failed.
Note- Some phones are not supported for kingo root you need to wait for update.

Have Fun!!

Fix The program cant start because steam_api.dll is missing from your computer.

he guys you can fix steam_api.dll you don't have to need reinstall your game again just download the steam_api.dll file from google and paste it to your game directory like if you are having this problem into your call of duty modern warfare then you need to go into your installed game directory which path is   C:\Program Files (x86)\Call Of Duty MW3 then paste your steam_api.dll into this directory.. then you can able to play your game.
you can see into screen shot when I don't have steam_api.dll into my game directory it shows error but when I download steam_api.dll and paste it into game directory I am able to play my game..you can try this into any game which shows .dll missing error.

Have Fun!!

Saturday, 6 February 2016

The hard drive is probably full !! 100% works.


Hello guys if you are having problem while you are playing very heavy games like call of duty and more...
you only have to do open your game exe(application) file using run as administrator. then you will no longer get this error or you are able to play your game..

if you still having this problem you need to move you installed game from c drive to another drive which has more space then c drive it will fix your problem..

thank you!!

for video support subscribe me here https://www.youtube.com/bharatadhanajustme  

how to fix .dll error or 0xc000007b

Hello guys I will tell you how to fix the .dll or 0xc000007b missing error into any games..
first I want to tell you that this error is occurs due to missing files of directx.
when you are installing your game you forgot to install the directx features or sometimes
the files are corrupted.

so to fix these errors you need to update your dirctx or reinstall that.
after doing this you can able to play your games again you don't have need to reinstall you game again.
thank you!
if you still have any problem feel free to contact me. :)

I am also providing the link for video support https://youtu.be/c-9ZxFpoh70